1. Installation
To be able to participate in this workshop, you need to first install some tools.
This workshop is based on the nRF52840 DK board and a 1.77" SPI display based on the ST7735S chip.
Meaning of the colored boxes
Certain information in this workshop is highlighted with colored boxes. This is their meaning:
Action
An action you should perform.
Info
Some extra information which may be helpful.
Warning
Some information that you should read to prevent some errors.
Installing Rust
As this is a Rust workshop, you first need to install the needed Rust toolchain.
The easiest way is through installing rustup https://www.rust-lang.org/tools/install.
Make sure that you have at least a version of Rust higher than 1.75.
You can check your current version of Rust through: rustc -V.
If you do not have a recent enough version, please update with rustup update stable.
You may use your editor of choice, but we recommend VSCode https://code.visualstudio.com/.
Make sure that you also install the rust-analyzer-plugin for your editor.
In the case of VSCode this is https://marketplace.visualstudio.com/items?itemName=rust-lang.rust-analyzer
Installing tools for communicating with the nRF52840 DK
To be able to communicate with the nRF52840 DK, we need to configure our systems,
and potentially install a driver.
Linux
On Debian-based distributions:
$ sudo apt-get install libudev-dev libusb-1.0-0-dev pkg-config
$ cat /etc/udev/rules.d/50-oxidize-global.rules
# udev rules to allow access to USB devices as a non-root user

# nRF52840 Dongle in bootloader mode
ATTRS{idVendor}=="1915", ATTRS{idProduct}=="521f", TAG+="uaccess"

# nRF52840 Dongle applications
ATTRS{idVendor}=="2020", TAG+="uaccess"

# nRF52840 Development Kit
ATTRS{idVendor}=="1366", ENV{ID_MM_DEVICE_IGNORE}="1", TAG+="uaccess"
For Arch Linux
There is a package for the udev rules in the repos. To install it with paru: paru -S nrf-udev
Windows
For Windows, to be able to program the chip on the development kit,
you should associate the device with WinUSB.
This is because the tools needed to write to a device are based on libusb.
Therefore, a libusb compatible driver should be installed.
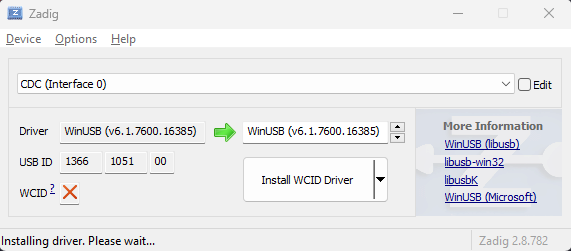
The easiest way to accomplish this is through a tool called Zadig (https://zadig.akeo.ie) which will do most of the heavy lifting.
Note that Zadig works on a per-device basis and may remove previously installed JLink drivers.
If you require the JLink drivers to persist on your computer, make sure that you only overwrite the drivers associated with your current development kit.
To install through winget:
$ winget install akeo.ie.Zadig
After installation, disconnect all USB devices from your computer and connect your development kit.
Open now Zadig and select your device.
The USB id should now be starting with 1366 1015.
If this is the case, click on Install WCID Driver/Replace driver.
If for some reason Zadig does not recognize you device, try to enable Options>List all devices.
When looking for the correct device, try to look for the ones that have as a driver something with JLink in their name.
Installing Rust embedded related tools
We are now going to install the required Rust tools to flash our programs to a real device.
Some tools in the following list are optional (annotated with optional), and may be handy if you later want to dig in deeper into embedded Rust.
$ cargo install probe-rs-tools --locked # easily flash and view logs
$ cargo install flip-link # help with stack protection, when overflowing
$ cargo install cargo-binutils # optional, tools for analyzing final binary
$ rustup +stable component add llvm-tools-preview # optional, tools for analyzing final binary
Clone the repository with the starters code
$ git clone https://gitlab.com/etrovub/smartnets/rustiec-embedded/embedded-101.git --recurse-submodules
$ cd embedded-101
Now proceed by trying to build the initial template. The first time you will run this command, will also install the last remaining tools.
$ cargo build
If you are curious about how the configuration works and how Rust knows how to install which toolchains, here is a list of the most important files and their current purpose.
.cargo/config.toml: Configureprobe-rsas a runner, so we can upload our binaries immediately to our device. It also sets the correct compilation target as the default target, and setsflip-linkas the used linker for better stack overflow protection.rust-toolchain.toml: Tell Rust which targets need to be present for a correct working project.memory.x: As we are working with an embedded target, we need to tell the linker how to place the different memory blocks in memory. Most of the work is already done by some of the crates we are using, but they still need some values specific for our device to be defined.build.rs: Putmemory.xin a known location for the linker to find it and adds extra linker arguments, so we can have debug output.Cargo.toml: Configures the dependencies of our project.
2. Blinky
Used includes for this chapter:
use defmt::info;
use embassy_executor::Spawner;
use embassy_nrf::gpio::{Level, Output, OutputDrive};
use {defmt_rtt as _, panic_probe as _};
As a first step, we are going to make an embedded hello-world program: a blinking LED. This will be combined with sending logging information back to your computer.
For this first exercise, you will not need any extra wiring or hardware as the development kit already has 4 LEDs ready to be used.
For now we will only use the first LED at GPIO pin P0.13.
Anatomy of an embedded Rust program
Programming for an embedded device is different in comparison to programming an application for a full blown operating system.
Normally you would have access to a standard library, an easy way of defining an entry point (main or start function), and access to standard out/in/err.
This is however not available on an embedded device where the only program running, is the code you write.
You would need to write your own operating system in some sense.
This is however not trivial. As the chip you are programming for only understands numbers, basic instructions and registers. Most of the more interesting registers available can be accessed by so called memory mapped IO. These can be accessed by writing to a specific place in memory and control most of the chip's functionality.
However, changing these memory mapped IO registers directly is tedious and very error prone.
A small typo in a memory address may result in many hours of head scratching.
Rust therefore provides a tool to help us with this exact problem.
Meet svd2rust (https://docs.rs/svd2rust/latest/svd2rust/).
Many manufacturers provide an svd file with all the available hardware features for a specific chip.
This tool takes such a file and creates idiomatic Rust bindings for it.
These generated bindings are most often called PACs (Peripheral Access Crates)
and are for the most part already available on https://crates.io/search?q=pac.
Using these PACs directly still requires a deep understanding of the chip's internals and is not what you would use day-to-day. Instead most would use a HAL (Hardware Abstraction Layer). These again are mostly provided on https://crates.io/search?q=hal, and this is what we will use in today's workshop.
Although knowledge of the PAC is not always required, it provides an escape hatch for when more fine grained control is needed or a specific hardware feature is not provided by the chosen HAL.
Note that at the time of writing, there are two big ecosystems.
embedded-hal (https://docs.rs/embedded-hal/latest/embedded_hal/) is currently the most prominent API for new HAL implementations to conform to.
This means that if you are a driver/library author, you should be able to write against this API and have your code being agnostic to any chip with a compatible HAL.
This however, comes sometimes at the cost of having to write for a common denominator.
Another provider of HALs is embassy (https://embassy.dev/) which uses embedded-hal at its core,
but also provides its own types and systems better suited for async programming.
Actually, embassy provides first and foremost an async executor enabling async code on embedded hardware for supported architectures (ARM, RISCV, WASM, std-enabled).
This means that you can run different tasks concurrently without needing to resort to something like a complete operating system like FreeRTOS in the C world.
We will use embassy as our base for todays workshop.
Now enough about PACs and HALs, lets look at some code.
In the repository you cloned last chapter, there is a minimal example in src/main.rs that already can be compiled.
#![no_std]
#![no_main]

// Ignore these following two lines, we are going to use these in a later chapter
// and are not important right now
mod frame_buffer;
mod game;

use defmt::info;
use embassy_executor::Spawner;
use {defmt_rtt as _, panic_probe as _};

#[embassy_executor::main]
async fn main(_spawner: Spawner) {
    let _p = embassy_nrf::init(Default::default());
    info!("Hello world");
}
The first line is needed to tell Rust not to include the standard library by default as for our development board there is none available. The second line is needed to tell Rust to not emit a main or start symbol, as the hardware does not know of the existence of such symbol.
However, you still want a program to start at a certain known entrypoint.
On ARM, this is done by putting the address of your program's entrypoint at a specific location in a vector table.
Once this is done, your code will be executed, starting at the location specified there.
To make this easier, we put the attribute macro #[embassy_executor::main] right above async fn main.
To make Rust compile and work properly, there needs to be a way for panic! to be defined (eh_personality error).
In a normal setting, Rust would either unwind the stack or immediately abort and log a message with the error.
As this is not always possible in an embedded setting, we must ourselves define the desired behavior for our target device.
Luckily for us, some other nice people already did most of the hard work and packaged this in a crate called panic_probe (https://docs.rs/panic-probe/0.3.1/panic_probe/), which configures a correct panic handler.
Next, we should take a better look at the signature of main. It's async.
This is possible due to the attribute macro right above which also initiates an executor and starts our main function in an async context together with a spawner.
This way, we can start spawning new tasks as needed.
Later on, we will get rid of the macro and add our own executors with which we will be able to manage priorities for certain tasks.
As a last step, we have the contents of our main function:
let _p = embassy_nrf::init(Default::default());
info!("Hello world");
The first line calls the HAL for our chip and initializes it to a working state.
When you have worked with an Arduino in the past, think of this as everything that must happen before setup is called.
The second line prints Hello world.
This is possible through the crate defmt which provides a way of communicating with your development PC through the RTT protocol.
This is not the same as you would have with Serial.println in Arduino, but rather a trick that works with the debugger interface available on the development kit.
Blinking LED
To make an LED blink, we must first acquire ownership of the desired resource.
In our case for the first LED, we must get ownership of the peripheral P0_13.
The result of the initialization of the HAL gives us a struct with ownership over all peripherals available to the device.
To configure this pin into a GPIO out pin, we must write the following:
let p = embassy_nrf::init(Default::default()); // changed
info!("Hello world");
// NEW
// Without access to p, we cannot construct the output pin
let mut led = Output::new(p.P0_13, Level::Low, OutputDrive::Standard);
Now that we have an output pin, we can start finalizing our blinking LED example.
Add the following to main:
let interval = embassy_time::Duration::from_millis(1000);
loop {
    led.set_high();
    embassy_time::Timer::after(interval).await; // wait for a second
    led.set_low();
    embassy_time::Timer::after(interval).await; // wait for a second
}
The final result looks like:
#![no_std]
#![no_main]

// Ignore these following 2 lines, we are going to use these in a later chapter
// and are not important right now
mod frame_buffer;
mod game;

use defmt::info;
use embassy_executor::Spawner;
use embassy_nrf::gpio::{Level, Output, OutputDrive};
use {defmt_rtt as _, panic_probe as _};

#[embassy_executor::main]
async fn main(_spawner: Spawner) {
    let p = embassy_nrf::init(Default::default());
    info!("Hello world");

    // Configure led to be an output
    // P0.13 is LED 1
    let mut led = Output::new(p.P0_13, Level::Low, OutputDrive::Standard);

    let interval = embassy_time::Duration::from_millis(1000);
    loop {
        led.set_high();
        embassy_time::Timer::after(interval).await; // wait for a second
        led.set_low();
        embassy_time::Timer::after(interval).await; // wait for a second
    }
}
Running the blinky LED
If you have followed this far, you should have a blinking LED that is ready to be programmed on the development kit. To do this, we must first set some environment variables before running the application.
On bash/fish:
$ DEFMT_LOG="trace" cargo run
On PowerShell:
$ $env:DEFMT_LOG="trace"
$ cargo run
This will build the project, report on possible errors and flash the final binary to the development kit. After this is done, it will show the log generated on the device, and hiding all the ones that have not a high enough importance. The level of logging is controlled through the environment variables set in the above commands.
Troubleshooting
ARM error, not enough permissions to erase all
Some of these boards used during this workshop are new, and are still locked.
Before you are able to program these, you must first unlock them.
A first option is to try to erase them through probe-rs.
You may need to run this command a second time, before the chip actually gets unlocked.
cargo run -- --allow-erase-all
If this does not work, you may try to install the vendor specific tools. You can install them from the Nordic website https://www.nordicsemi.com/Products/Development-tools/nrf-command-line-tools/download.
For Arch Linux
You can install these tools from the AUR: paru -S nrf5x-command-line-tools.
For MacOS
You can install these tools through Homebrew: brew install nordic-nrf-command-line-tools
Once you have installed the necessary tools, run the following commands:
$ nrfjprog --recover
$ nrfjprog --eraseall # Only if previous did not work, if succesful, retry previous
The instructors have these tools installed and can help you if you are stuck.
3. Add a display
Used includes in this chapter:
use defmt::{info, unwrap};
use embassy_executor::Spawner;
use embassy_nrf::{
    bind_interrupts,
    gpio::{Level, Output, OutputDrive},
    peripherals, spim,
};
use embedded_graphics::{
    image::{Image, ImageRaw, ImageRawLE},
    pixelcolor::Rgb565,
    prelude::*,
    primitives::{PrimitiveStyle, StyledDrawable},
};
use {defmt_rtt as _, panic_probe as _};
Next up we are going to add a display and show an image on it. In this chapter, we are going to implement the display in a synchronous manner, and later on adapt it, so we end up with an async implementation.
Connecting the display
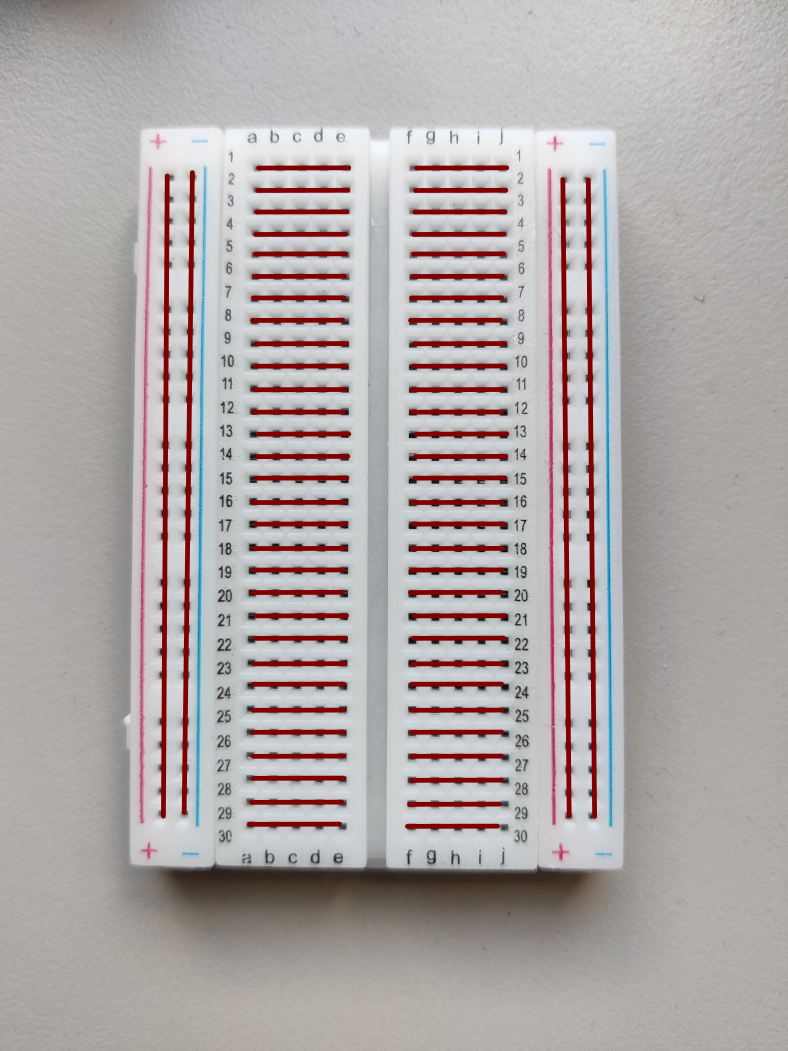
How does a breadboard work?
Breadboards are tools that help with quick prototyping of electrical designs. They aid by having a simple way of connecting components without soldering. The holes are connected like in the following image. So, if you want to connect two wires/components, you need to put their metal ends in one of the connected holes. As long as the holes are connected, the components will be too.
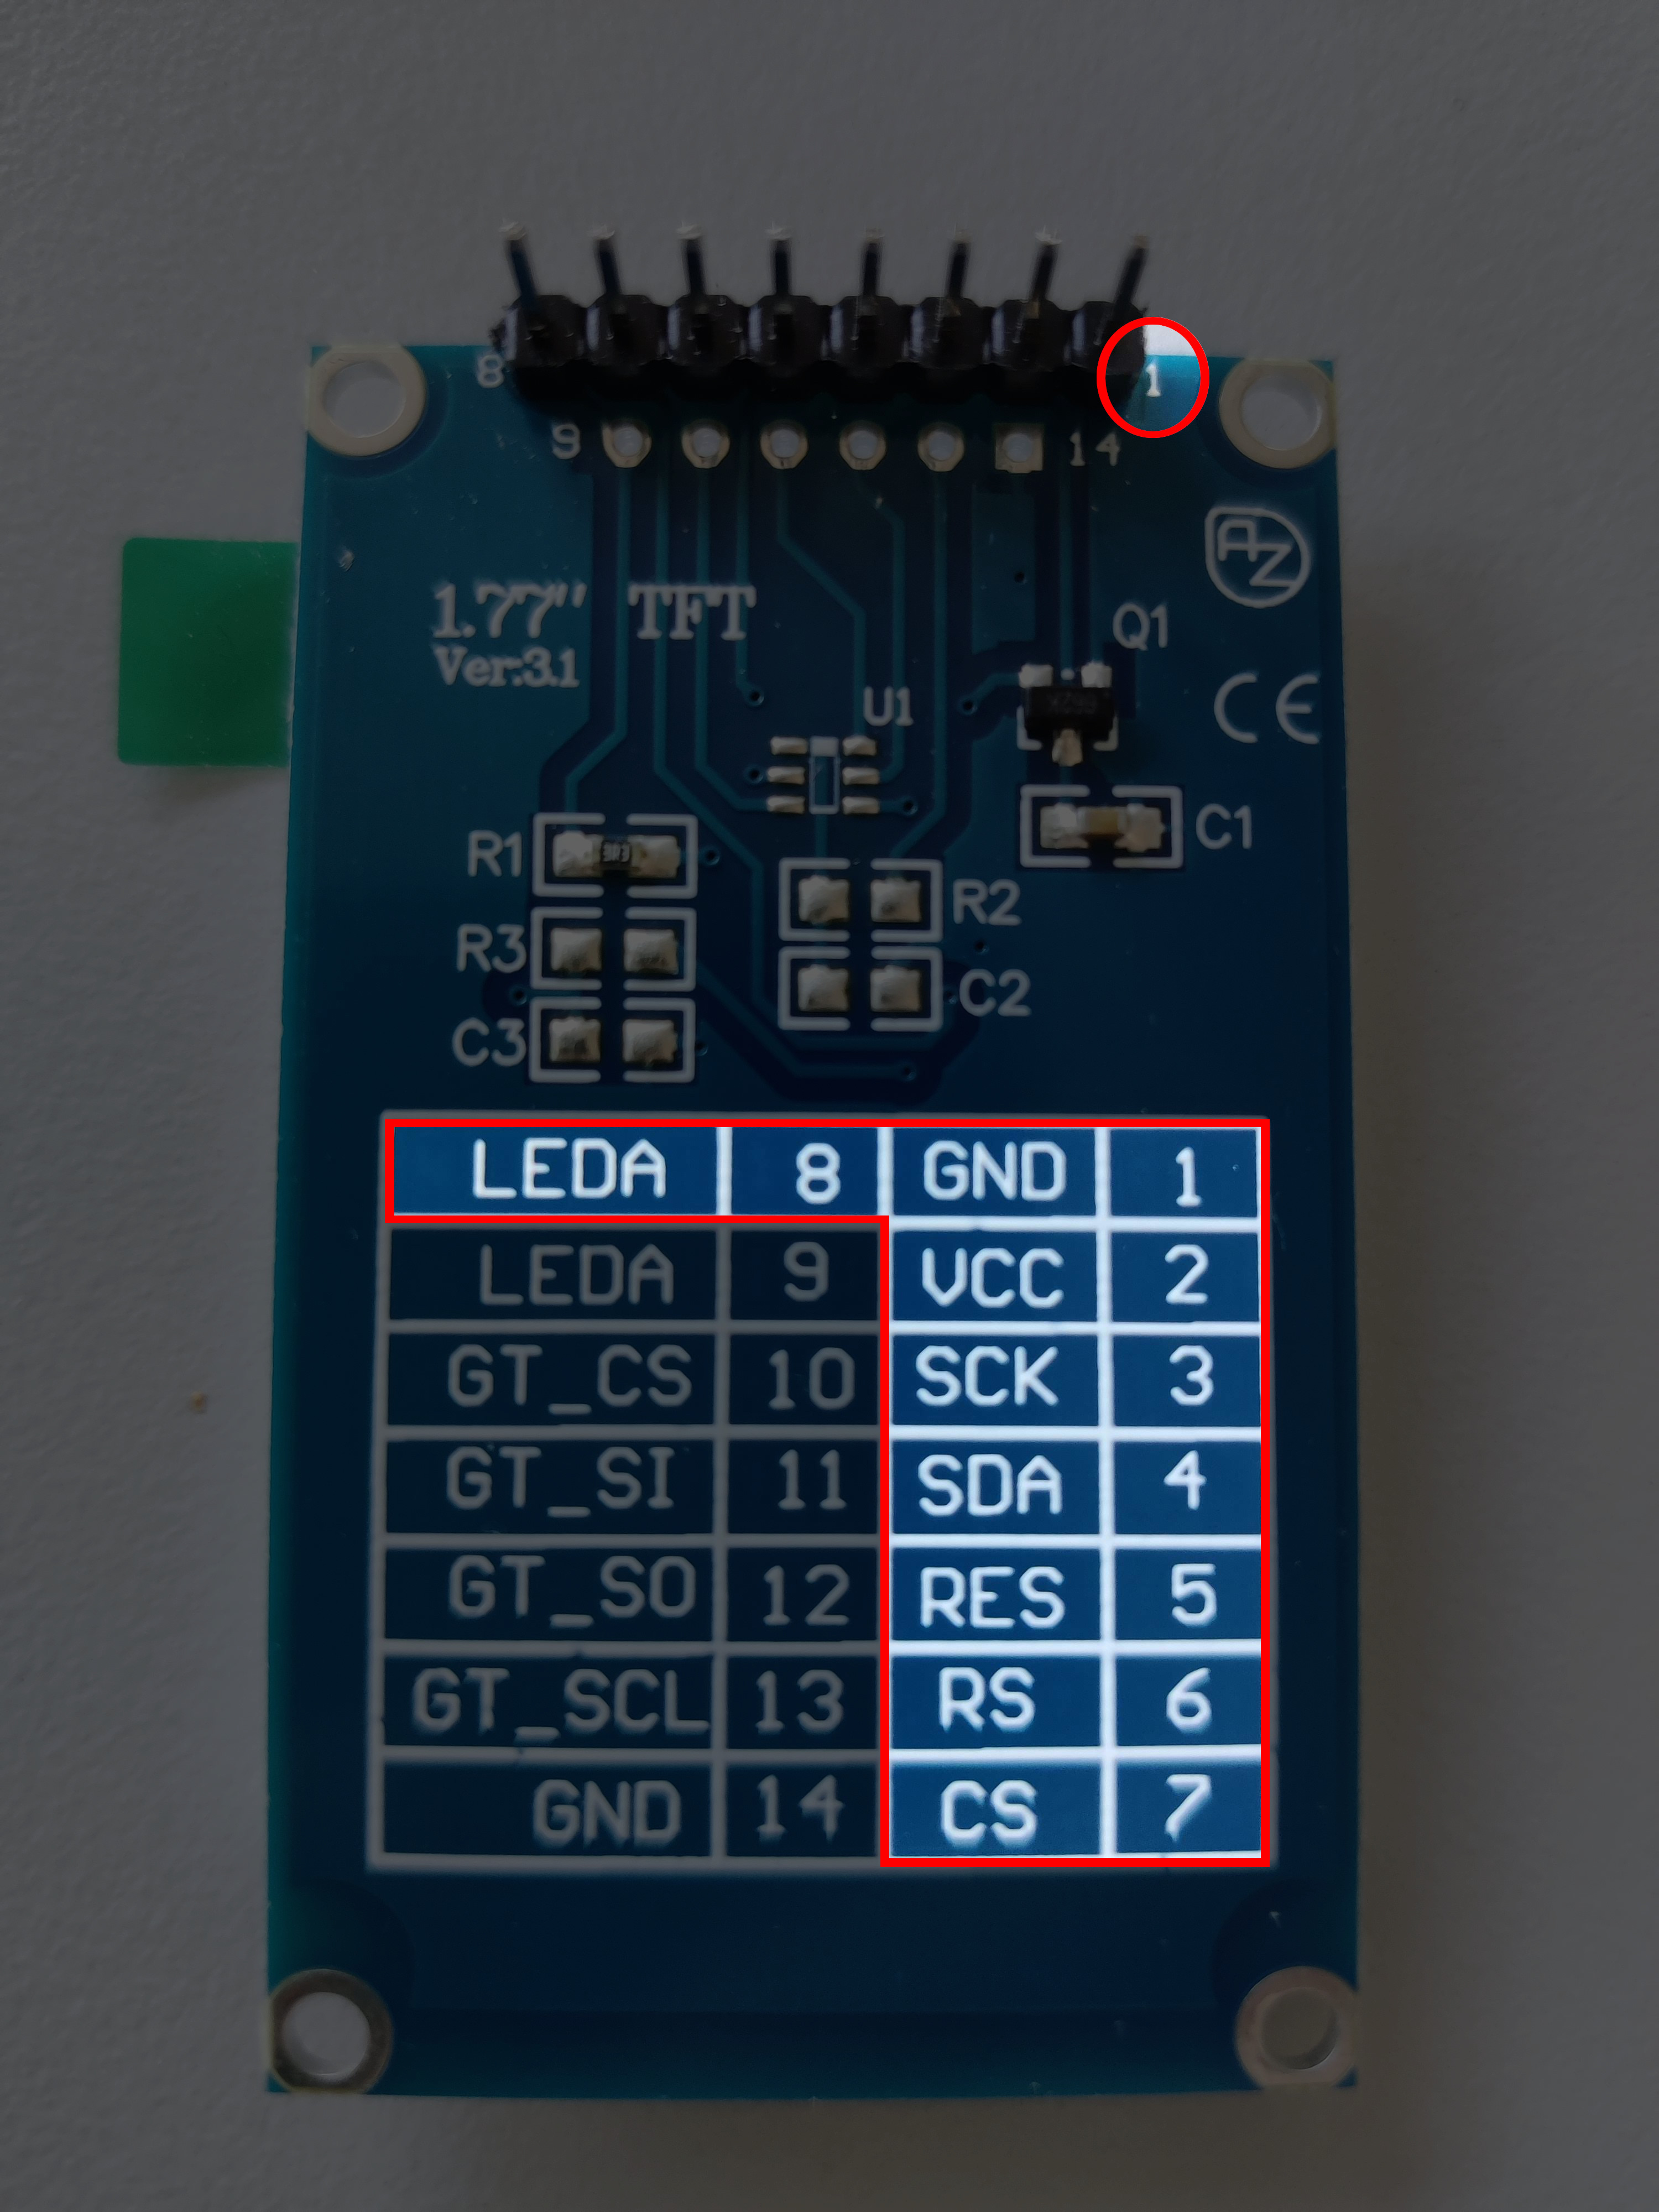
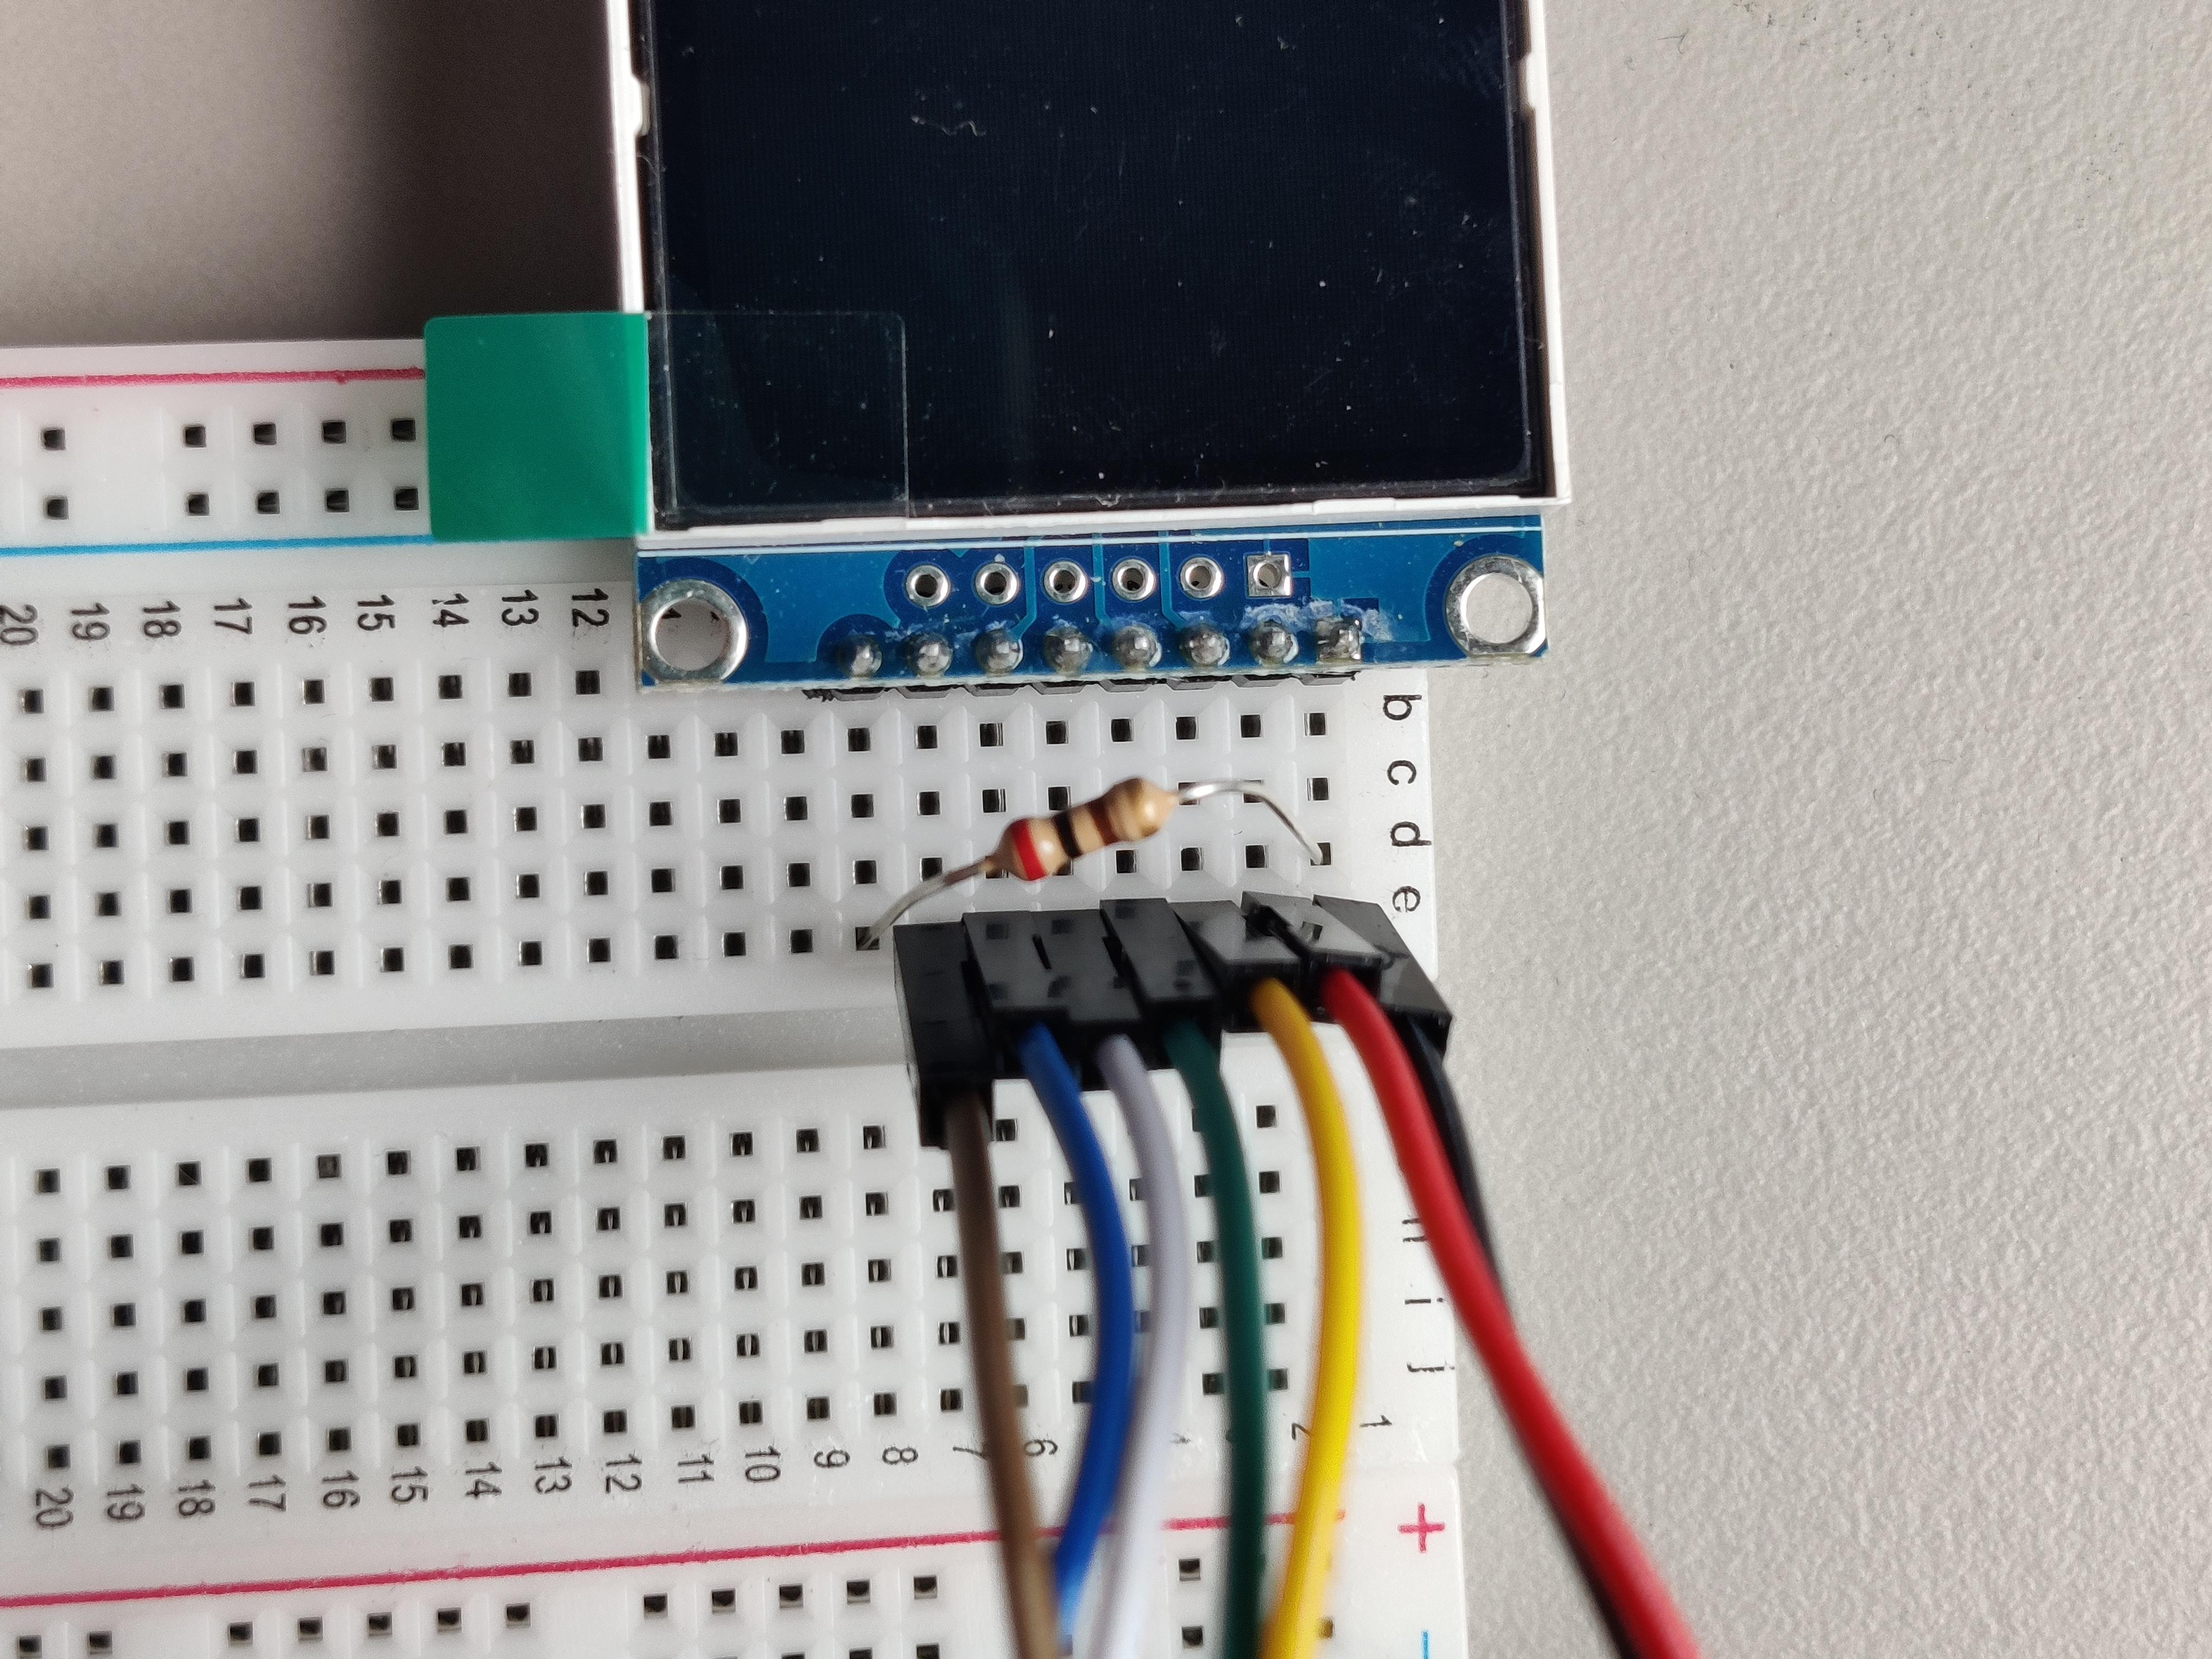
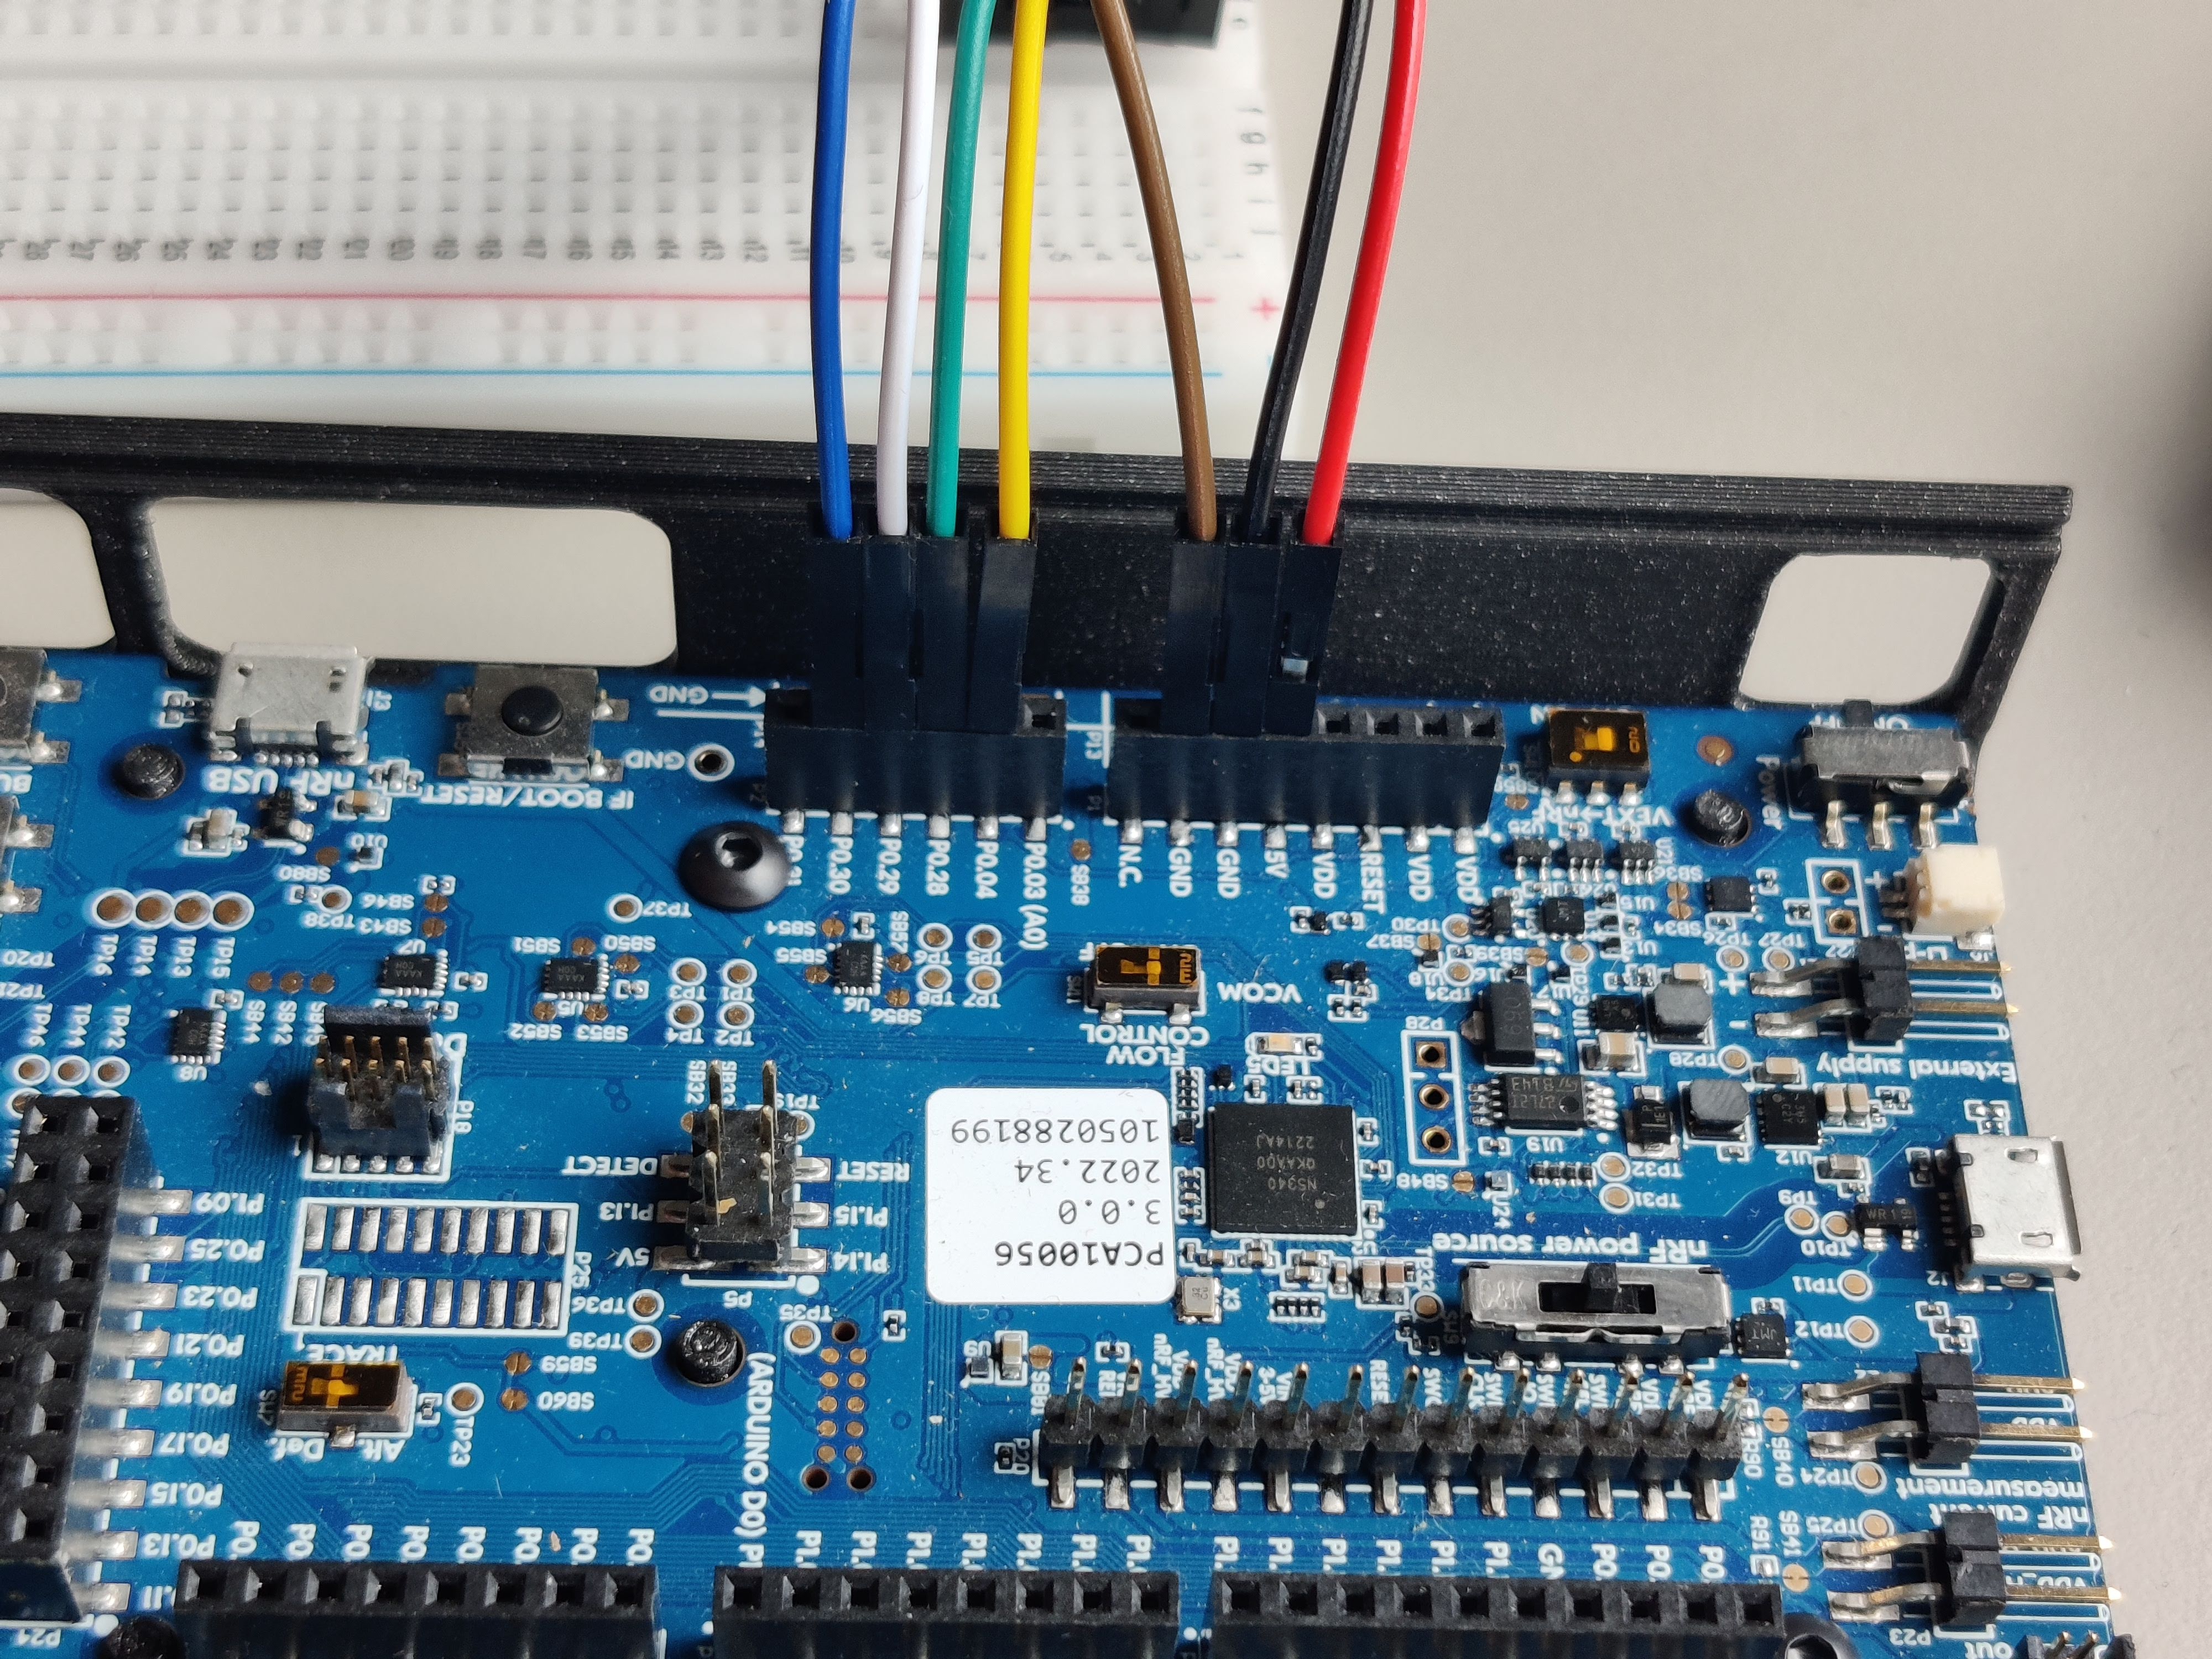
Before we can do anything with the display, we must connect it to the development kit. Make sure you disconnect everything from your computer to prevent short circuits before connecting anything. You should now connect the following pins as described below.
For the pins on the display, look at the back of the display where you will find the needed markings. When you are done, ask one of the course instructors to look at your wiring to verify its correctness. Once your circuit is correct, you may run the code at any time you may want to test.
| Display | nRF |
|---|---|
| Pin 1 (GND) | GND (any GND is ok) |
| Pin 2 (VCC) | VDD |
| Pin 3 (SCK) | P0.04 |
| Pin 4 (SDA) | P0.28 |
| Pin 5 (RES) | P0.29 |
| Pin 6 (RS) | P0.30 |
| Pin 7 (CS) | GND |
| Pin 8 (LEDA) | 220 Ohm resistor to VDD |
Programming the display to show an image
As some may already have noticed, this display is connected through SPI with only master-to-slave (MOSI) communication. This means we need to get a hold of the ownership of one of the SPI interfaces in the chip. The nRF chip distinguishes between master and slave connections. As such, we must use one of the master connections.
As Embassy is an async executor, it needs a way to know whether there is data to be written or read. This is done through interrupts.
For our purpose, put the following above main:
bind_interrupts!(struct Irqs {
    SPIM3 => spim::InterruptHandler<peripherals::SPI3>;
});
This will bind interrupts of the master interface of SPI3 in a way accessible for our next step, initializing SPIM3.
let mut config = spim::Config::default();
config.frequency = spim::Frequency::M32; // we will communicate at 32Mbps
let spi = spim::Spim::new_txonly(p.SPI3, Irqs, p.P0_04, p.P0_28, config); // setup SPIM3
Once this is done, our display still needs access to RES (reset) and RS ("register select", or sometimes called D/C for "data command").
These need to be put in output mode.
let res = Output::new(p.P0_29, Level::Low, OutputDrive::Standard);
let rs = Output::new(p.P0_30, Level::Low, OutputDrive::Standard);
Now we have all the necessary peripherals, we can configure the display. The needed steps are:
- Construct an instance of the display
- Send the initialization commands to the display
- Set an orientation for the display
- Draw something
We already have the peripherals ready, so the first 3 steps are easy:
let mut delay = embassy_time::Delay; // blocking delay, use with caution
// spi, rs, res, is_rgb, is_inverted, width, height
let mut display = st7735_lcd::ST7735::new(spi, rs, res, true, false, 160, 128);
display.init(&mut delay).unwrap(); // send display init commands
display.set_orientation(&st7735_lcd::Orientation::Landscape).unwrap(); // set the correct orientation
Now we have a working display, but not yet something shown on it.
Just like embedded_hal, there exists an embedded_graphics API providing a similar purpose in abstracting over multiple kinds of displays.
The driver we are using for our display supports this API, so we can use the higher level drawing commands, without needing to directly communicate with the display.
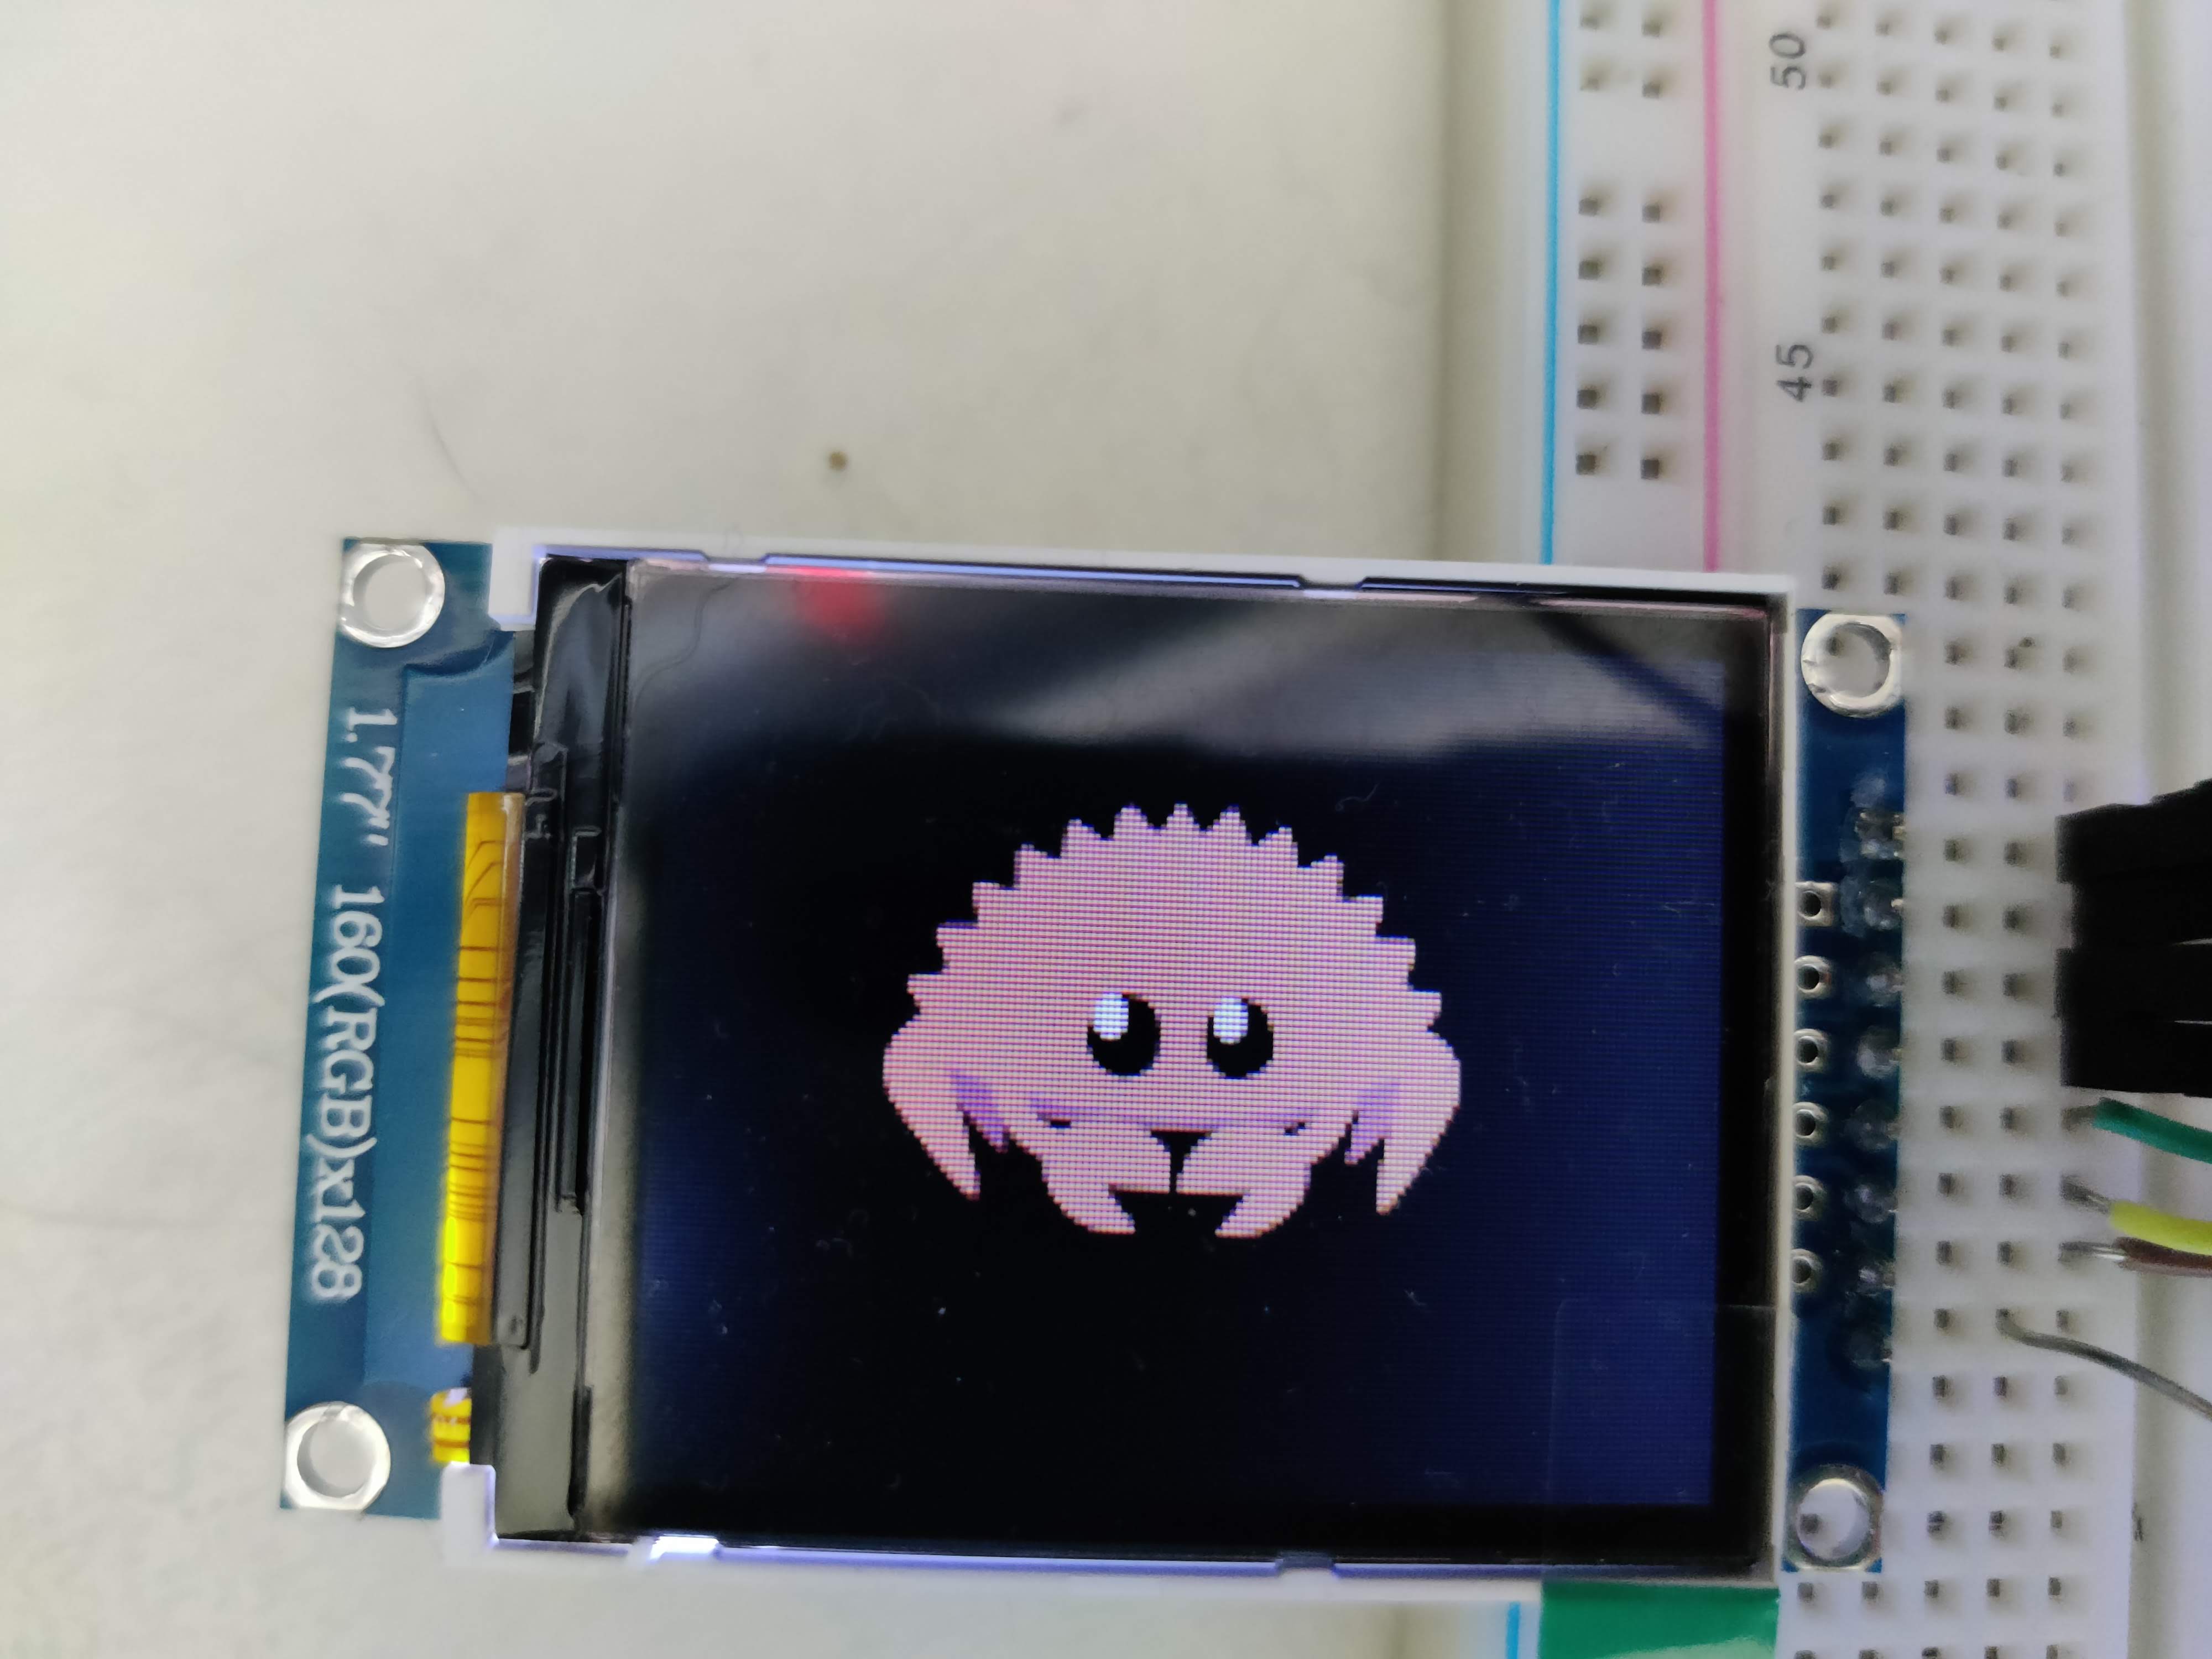
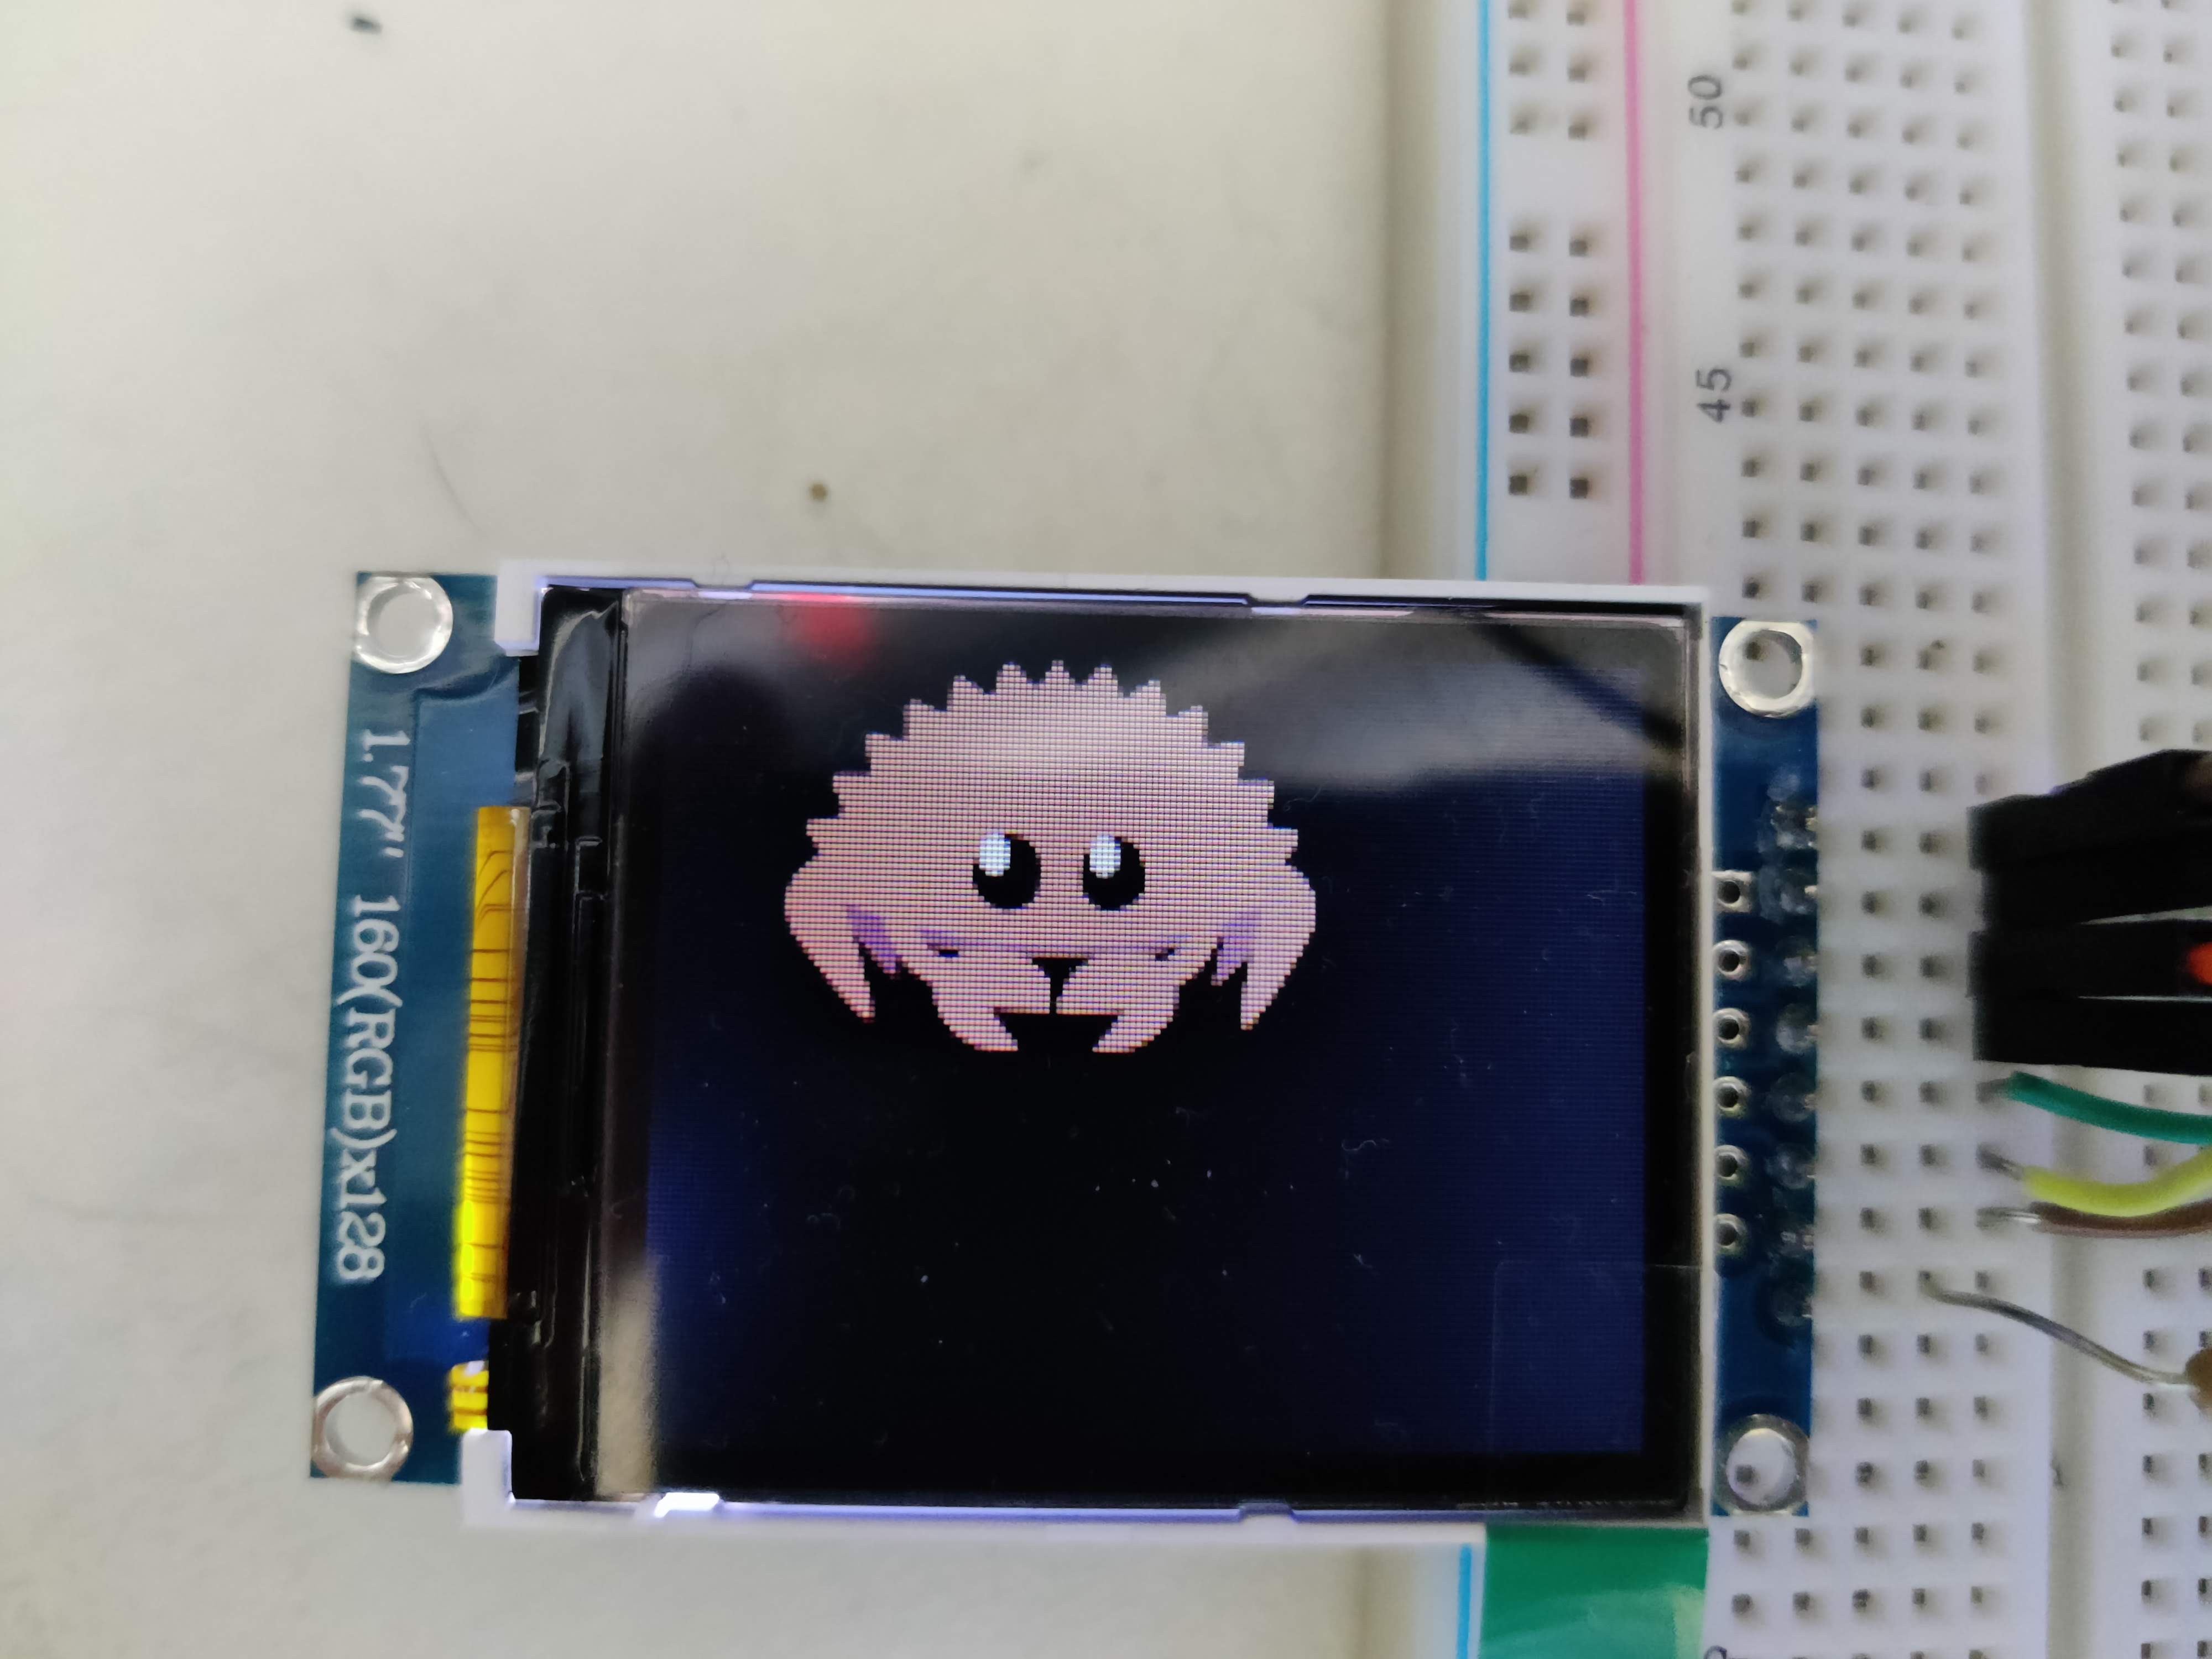
We are going to draw two things: first clearing the display by drawing a rectangle filling the entire screen, and second, an image with Ferris (the unofficial Rust mascot).
// define the rectangle and the way it should be drawn
let rectangle = display.bounding_box();
let style_black = PrimitiveStyle::with_fill(Rgb565::BLACK);

// define the image (uses one of the assets) and translates it to a desired position
let image_raw: ImageRawLE<Rgb565> = ImageRaw::new(include_bytes!("../assets/ferris.raw"), 86);
let image = Image::new(&image_raw, Point::new(34, 25));

// actually start drawing, by sending the commands to the display
unwrap!(rectangle.draw_styled(&style_black, &mut display));
unwrap!(image.draw(&mut display));
Here follows the completed example combined with the previous chapter:
#![no_std]
#![no_main]

// Ignore these following 2 lines, we are going to use these in a later chapter
// and are not important right now
mod frame_buffer;
mod game;

use defmt::{info, unwrap};
use embassy_executor::Spawner;
use embassy_nrf::{
    bind_interrupts,
    gpio::{Level, Output, OutputDrive},
    peripherals, spim,
};
use embedded_graphics::{
    image::{Image, ImageRaw, ImageRawLE},
    pixelcolor::Rgb565,
    prelude::*,
    primitives::{PrimitiveStyle, StyledDrawable},
};
use {defmt_rtt as _, panic_probe as _};

// Embassy needs something to wake itself on read/write interrupts.
// This is like a certification of ownership that we alone have access to these interrupts
bind_interrupts!(struct Irqs {
    SPIM3 => spim::InterruptHandler<peripherals::SPI3>;
});

#[embassy_executor::main]
async fn main(_spawner: Spawner) {
    let p = embassy_nrf::init(Default::default());
    let mut led = Output::new(p.P0_13, Level::Low, OutputDrive::Standard);

    // Configure SPI Master 3
    let mut config = spim::Config::default();
    config.frequency = spim::Frequency::M32; // communicate with screen at 32Mbps
    let spi = spim::Spim::new_txonly(p.SPI3, Irqs, p.P0_04, p.P0_28, config);
    let res = Output::new(p.P0_29, Level::Low, OutputDrive::Standard); // reset pin
    let rs = Output::new(p.P0_30, Level::Low, OutputDrive::Standard); // pin that helps distinguis between data and commands

    let mut delay = embassy_time::Delay;
    let mut display = st7735_lcd::ST7735::new(spi, rs, res, true, false, 160, 128); // create screen instance
    display.init(&mut delay).unwrap(); // actually send out first commands to display
    display
        .set_orientation(&st7735_lcd::Orientation::Landscape)
        .unwrap(); // set the orientation for our display

    let rectangle = display.bounding_box(); // get max bounds of display
    let style_black = PrimitiveStyle::with_fill(Rgb565::BLACK);

    // import Ferris image (note 86 as in example code for display driver 85 is written -> WRONG)
    let image_raw: ImageRawLE<Rgb565> =
        ImageRaw::new(include_bytes!("../../assets/ferris.raw"), 86);
    let image = Image::new(&image_raw, Point::new(34, 25));

    // make the actual draw calls -> SPI magic
    unwrap!(rectangle.draw_styled(&style_black, &mut display));
    unwrap!(image.draw(&mut display));

    let interval = embassy_time::Duration::from_millis(1000);
    loop {
        led.set_high();
        info!("Hello world");
        embassy_time::Timer::after(interval).await;
        led.set_low();
        embassy_time::Timer::after(interval).await;
    }
}
4. Async display
Used includes in this chapter
use defmt::unwrap;
use embassy_executor::Spawner;
use embassy_nrf::{
    bind_interrupts,
    gpio::{Level, Output, OutputDrive},
    peripherals,
    spim,
};
use embedded_graphics::{
    image::{Image, ImageRaw, ImageRawLE},
    pixelcolor::{raw::RawU16, Rgb565},
    prelude::*,
};

use static_cell::StaticCell;
use {defmt_rtt as _, panic_probe as _};
We now have a working display example of Ferris with a black background. The next step is to try and use some more goodies of Embassy's executor and profit from its async superpowers.
This however, is not as trivial yet.
embedded_graphics uses a lot of iterators and callbacks in its API, which makes it rather difficult to not resort to blocking calls.
This would defeat the usefulness of async.
The reason why we need to resort to blocking calls, is because Rust's iterators do not support async.
There are proposals to add streams to the language, but these need some more work before they become stable.
For now, embedded_graphics gives us a nice API to communicate with a display and provides the ability to reason about higher abstraction draw calls.
In this chapter we will use an adapted version of the screen driver we used last chapter.
The API is almost the same as the previous, except most functionalities are now async functions (built on top of embedded_hal_async).
Doing this requires us to no longer directly use embedded_graphics.
We will fix this by using a framebuffer on which we will implement the DrawTarget-trait and use that for all our draw calls from embedded_graphics.
Once we have a finished image, we take the buffer and directly write it to the screen with our modified driver, but this time asynchronously.
This is more efficient, as the main core in the chip can now sleep while the image is being transferred to the display.
The framebuffer
Go to the file src/frame_buffer.rs.
In here, we will implement our framebuffer.
There is already a skeleton implementation of the final framebuffer which you will have to complete.
Here follows the framebuffer's definition and its constructor.
pub struct FrameBuffer {
    buf: [Rgb565; 160 * 128],
}

impl FrameBuffer {
    const WIDTH: usize = 160;
    const HEIGHT: usize = 128;

    pub fn new() -> Self {
        buf: [Rgb565::BLACK; 160 * 128],
    }
}
Rgb565 encodes five bits for red, six bits for green, and five bits for blue.
Normally we would expect to represent RGB values with at least eight bits per channel, but this is wasteful in the current context as our display cannot represent all colors in the RGB range with eight bits per channel.
Another bonus of using Rgb565 is that it only uses 16 bits which makes it word aligned.
This improves the memory read/write efficiency on our embedded device.
The reason why we let green have one more bit of precision, is because the human eyes are more susceptible for deviations in the green channel.
Next we will need to implement two traits from embedded_graphics: DrawTarget and OriginDimensions.
To help with implementing the following portion, take a look at the following four resources:
DrawTargetminimal example + docs: https://docs.rs/embedded-graphics/latest/embedded_graphics/draw_target/trait.DrawTarget.htmlOriginalDimensionsdocs: https://docs.rs/embedded-graphics/latest/embedded_graphics/geometry/trait.OriginDimensions.htmlDimensionsautomatically implemented whenOriginalDimensionsis implemented: https://docs.rs/embedded-graphics/latest/embedded_graphics/geometry/trait.Dimensions.htmlRectanglevery useful for doing some of the calculations: https://docs.rs/embedded-graphics/latest/embedded_graphics/primitives/rectangle/struct.Rectangle.html
To start, you already have the following boilerplate code.
You should now implement the methods marked with todo!.
impl DrawTarget for FrameBuffer {
    type Color = Rgb565;

    type Error = Infallible;

    // ACTUALLY THE ONLY REQUIRED METHOD
    // write individual pixels to the buffer
    // a pixel is a tuple of a position and a color
    // => write the color value to the correct position
    // in the buffer. The way we can find the position in
    // buffer is through the following formula: i = y * WIDTH + x
    fn draw_iter<I>(&mut self, pixels: I) -> Result<(), Self::Error>
    where
        I: IntoIterator<Item = embedded_graphics::Pixel<Self::Color>>,
    {
        todo!()
    }

    // OPTIONAL, BUT RECOMMENDED
    // draws pixels that should be near each other.
    // We are overwriting here the default method for this trait.
    // By default, it uses the draw_iter method, but this can be
    // inefficient for certain displays. So, we implement these methods
    // to more efficiently make use of the underlying buffer.
    fn fill_contiguous<I>(
        &mut self,
        area: &embedded_graphics::primitives::Rectangle,
        colors: I,
    ) -> Result<(), Self::Error>
    where
        I: IntoIterator<Item = Self::Color>,
    {
        todo!()
    }

    // OPTIONAL, BUT RECOMMENDED
    // same as fill_contiguous, but 1 single color
    fn fill_solid(
        &mut self,
        area: &embedded_graphics::primitives::Rectangle,
        color: Self::Color,
    ) -> Result<(), Self::Error> {
        todo!()
    }

    /// Clears the entire screen
    fn clear(&mut self, color: Self::Color) -> Result<(), Self::Error> {
        self.buf.fill(color);
        Ok(())
    }
}

impl OriginDimensions for FrameBuffer {
    fn size(&self) -> Size {
        Size {
            width: Self::WIDTH as u32,
            height: Self::HEIGHT as u32,
        }
    }
}
If you are a bit unsure about iterators in Rust, then the following resources may help:
Solution draw_iter
fn draw_iter<I>(&mut self, pixels: I) -> Result<(), Self::Error>
where
    I: IntoIterator<Item = embedded_graphics::Pixel<Self::Color>>,
{
    for p in pixels.into_iter() {
        if self.bounding_box().contains(p.0) {
            self.buf[(p.0.y * Self::WIDTH as i32 + p.0.x) as usize] = p.1;
        }
    }
    Ok(())
}
Solution fill_contiguous
fn fill_contiguous<I>(
    &mut self,
    area: &embedded_graphics::primitives::Rectangle,
    colors: I,
) -> Result<(), Self::Error>
where
    I: IntoIterator<Item = Self::Color>,
{
    let mut colors = colors.into_iter();
    for y in area.rows() {
        let bias = y as usize * Self::WIDTH;
        let start = bias + area.columns().start.clamp(0, 159) as usize;
        let end = bias + area.columns().end.clamp(0, 159) as usize;
        for i in &mut self.buf[start..end].iter_mut() {
            *i = colors.next().unwrap_or_default();
        }
    }
    Ok(())
}
Solution fill_solid
fn fill_solid(
    &mut self,
    area: &embedded_graphics::primitives::Rectangle,
    color: Self::Color,
) -> Result<(), Self::Error> {
    for y in area.rows() {
        let bias = y.clamp(0, 127) as usize * Self::WIDTH;
        let start = bias + area.columns().start.clamp(0, 159) as usize;
        let end = bias + area.columns().end.clamp(0, 159) as usize;
        self.buf[start..end].fill(color);
    }

    Ok(())
}
Before we can call this finished, we still need a way to take a reference to the final buffer out of the struct.
For this, the AsRef trait is already implemented:
impl AsRef<[Rgb565; 160 * 128]> for FrameBuffer {
    fn as_ref(&self) -> &[Rgb565; 160 * 128] {
        &self.buf
    }
}
Drawing Ferris again...
As we have our adapted screen driver and our framebuffer, the hardest part is behind us. For the last part in this chapter, we will create a simple animation of our most favorite red sea creature moving from left to right.
The first step is to stop using the st7735-lcd crate and move to st7735-lcd-async.
The async version of the driver has already been added to your Cargo.toml.
st7735-lcd = "0.9.0" # old driver
st7735-lcd-async = { path = "st7735-lcd-async", features = ["defmt"] } # we are now going to use this one
This means that you should now change all occurrences of st7735_lcd to st7735_lcd_async.
In addition to this, the arguments of the constructor of the display have also changed, and as such should be updated.
- let mut display = st7735_lcd::ST7735::new(spi, rs, res, true, false, 160, 128);
+ let mut display = st7735_lcd_async::ST7735::new(spi, rs, res, true, false);
Next up is to call the async versions in the initialization process for our screen.
// convert to type-erased AnyPin
let res = Output::new(p.P0_29, Level::Low, OutputDrive::Standard);
let rs = Output::new(p.P0_30, Level::Low, OutputDrive::Standard);

let mut delay = embassy_time::Delay;
let mut display = st7735_lcd_async::ST7735::new(spi, rs, res, true, false); // CHANGED
display.init(&mut delay).await.unwrap(); // CHANGED
display
    .set_orientation(&st7735_lcd_async::Orientation::Landscape) // CHANGED
    .await // NEW
    .unwrap();
Then the only thing left for us, is to first draw the current frame to the framebuffer and once it is ready, push it out to the driver. To make it a bit more interesting, we will add an animation, where we move Ferris across the screen.
As a framebuffer uses a lot of memory, it is required for us to move the memory outside the future.
The way we do this is through a StaticCell.
// At the top of the file, add
use static_cel::StaticCell;

// setup framebuffer
static FRAMEBUFFER_CONTAINER: StaticCell<FrameBuffer> = StaticCell::new(); // NEW
let mut fb: &mut FrameBuffer = FRAMEBUFFER_CONTAINER.init(FrameBuffer::new()); // NEW

// Load the image back in (NOT CHANGED)
let image_raw: ImageRawLE<Rgb565> = ImageRaw::new(include_bytes!("../assets/ferris.raw"), 86);
let mut image = Image::new(&image_raw, Point::new(0, 0)); // give it a place
let mut x = 0;
loop {
    image = Image::new(&image_raw, Point::new(x, 0)); // This does not copy the image
    unwrap!(fb.fill_solid(&fb.bounding_box(), Rgb565::BLACK)); // clear the screen
    unwrap!(image.draw(fb)); // draw the image

    // the framebuffer is now ready, lets send async the final image to the screen
    unwrap!(
        display
            .set_pixels_buffered(
                0, // start x
                0, // start y
                159, // end x
                127, // end y
                // convert the framebuffer to an iterator with only u16
                // this is the way the display expects the rgb colors to arrive
                fb.as_ref().iter().map(|c| RawU16::from(*c).into_inner())
            )
            .await // async super powers
    );

    x += 10; // Move Ferris 10 pixels
    x %= 80; // To prevent Ferris from falling off the screen
}
5. Move display logic to separate task
Used includes in this chapter
use defmt::{info, unwrap};
use embassy_executor::Spawner;
use embassy_futures::yield_now;
use embassy_nrf::gpio::AnyPin;
use embassy_nrf::peripherals::SPI3;
use embassy_nrf::{
    bind_interrupts,
    gpio::{Level, Output, OutputDrive},
    peripherals, spim,
};
use embassy_sync::signal::Signal;
use embassy_sync::{blocking_mutex::raw::NoopRawMutex, mutex::Mutex};
use embedded_graphics::pixelcolor::raw::RawU16;
use embedded_graphics::{
    image::{Image, ImageRaw, ImageRawLE},
    pixelcolor::Rgb565,
    prelude::*,
};
use static_cell::StaticCell;
use {defmt_rtt as _, panic_probe as _};
Last chapter, we made a moving Ferris animation with an async version of the display driver.
We accomplished this by using a framebuffer that is able to communicate with embedded_graphics synchronously, while writing to the display asynchronously.
This is already something, but does not yet show the full potential of what we can do with Embassy. This is because we still wait to first process the framebuffer before we write everything out, so there are moments while writing to the display that Embassy has the opportunity to save some power by not waiting in a busy loop. For our initial simple example this might seem enough, but when working with more complex examples, we would like to have that other parts of our program also get the chance of making progress.
This is what we are going to accomplish in this chapter. We are going to separate the part that writes to the screen from the part that writes to the framebuffer to their own respective tasks, so they can make progress concurrently.
The steps we need to take for this will be:
- Initialize all necessary peripherals
- Create a framebuffer behind a mutex
- Create a signal for the drawing task to signal to the driver that there is new information available
- Make sure that all shared information stays valid during the rest of the program
- Spawn the different tasks
Spawning tasks in Embassy
Before we can do anything, we should first discuss on a high level what is needed for Embassy to run our tasks without the presence of a heap.
In Rust a Future can be seen as an enum (Rust) or a tagged union (C).
Every time a future cannot make progress due to having to wait for something, it stops itself and stores its state into this Future.
Every time the future wants to make progress, it starts by taking this enum and continues with its stored state.
This means it needs to store this state somewhere in memory.
In Embassy, every task has a storage pool of its own, where it can store its state while it is waiting to resume.
All the code needed for generating these tasks with their storage pools, is done by one of the 2 possible attribute macros.
// Task that is called as the entry point
// also starts up an initial executor
#[embassy_executor::main]
async fn main(spawner: Spawner) { todo!() }
// Creates a task + storage pool
// this macro also provides a variant
// with which it is possible to change
// the size of the storage pool, and thereby
// change the max total number of tasks
// that can be spawned. The default is 1 Future per task
#[embassy_executor::task]
async fn my_task() { todo!() }
As these tasks may outlive main, it is necessary that all arguments of a task live for the entire lifetime of the program ('static lifetime) or at least for as long as the corresponding task stays alive.
Another limitation of the way these tasks are created is that they may not accept any generic arguments, as this would possibly create multiple tasks at once without the corresponding storage.
To combat the first issue, we will use StaticCell.
This makes it possible to easily allocate static memory in which we can then store our shared resources.
The way we will do this, is very similar to the last chapter where we used a StaticCell for the FrameBuffer.
Prepare resources
In this section we will prepare the resources, so we can send them to the corresponding task. But first, we will define some type aliases to prevent having to type out the entire type too many times. Place these above main.
pub type FrameBufferType = Mutex<NoopRawMutex, FrameBuffer>;
pub type FrameBufferRef = &'static FrameBufferType;
pub type SignalType = Signal<NoopRawMutex, ()>;
pub type SignalRef = &'static SignalType;
pub type DisplayType = st7735_lcd_async::ST7735<
    spim::Spim<'static, SPI3>,
    Output<'static, peripherals::P0_30>,
    Output<'static, peripherals::P0_29>,
>;
pub type DisplayRef = &'static mut DisplayType;
With these types, we can start acquiring the required resources.
Notice the first generic parameter of Mutex is here NoopRawMutex.
If you want more information about mutexes in Rust + Embassy, see the appendix on mutexes.
But for now, Embassy has different types of mutexes, depending on the type of the hardware we are running on.
As our chip only has one core, and we are using the thread based executor (not the interrupt executor), we have enough protection with a NoopRawMutex as a backing mutex.
// In main
let led = p.P0_13; // CHANGED: Will make our life later a bit easier
let mut config = spim::Config::default();
config.frequency = spim::Frequency::M32;
let spi = spim::Spim::new_txonly(p.SPI3, Irqs, p.P0_04, p.P0_28, config);
let res = Output::new(p.P0_29, Level::Low, OutputDrive::Standard);
let rs = Output::new(p.P0_30, Level::Low, OutputDrive::Standard);

// setup display
let mut delay = embassy_time::Delay;
let mut display = st7735_lcd_async::ST7735::new(spi, rs.into(), res.into(), true, false);
display.init(&mut delay).await.unwrap();
display
    .set_orientation(&st7735_lcd_async::Orientation::Landscape)
    .await
    .unwrap();

// NEW: Adding StaticCells
static DISPLAY_CONTAINER: StaticCell<DisplayType> = StaticCell::new();
let static_driver: DisplayRef = DISPLAY_CONTAINER.init(display);

// CHANGED: setup framebuffer
static FRAMEBUFFER_CONTAINER: StaticCell<FrameBufferType> = StaticCell::new();
let mut fb_ref: FrameBufferRef = FRAMEBUFFER_CONTAINER.init(Mutex::new(FrameBuffer::new()));

// setup a signal, as we do not need to send information around,
// we can be ok with just sending the unit type ()
static SIGNAL_CONTAINER: StaticCell<SignalType> = StaticCell::new();
let signal_ref = SIGNAL_CONTAINER.init(Signal::new());
When importing types like Mutex/Signal/..., make sure that you import the ones from embassy_sync and not the ones from std,
because std is not available on the development kit.
Importing the synchronization primitives from std will therefore not work.
The specific Mutex you need from Embassy is the non-blocking one.
The other one will not allow you to use async to wait on the lock.
The NoopRawMutex, however, is blocking, but is needed for Embassy's internal concurrency management.
The call to StaticCell::init takes ownership of the variable you give it.
This implies that the memory is first possibly copied to transfer the ownership to StaticCell::init which will then copy it to a static memory location.
In the case of the framebuffer, this could introduce two expensive copies.
It is possible to remove one of the copies, by using StaticCell::uninit.
This then allows to do in-place construction, but would in our case remove some of the niceties of our API.
One last option, is to transmute the lifetime of FrameBuffer to static.
This is possible through unsafe and mem::transmute, but comes at the cost of having to make sure that the reference to the transmuted framebuffer stays valid until the end of the program.
Otherwise, you introduce undefined behavior in you Rust program.
Defining the async driver task
In this task, we wait for a signal, acquire the mutex and display the contents of whatever is stored in the framebuffer.
#[embassy_executor::task] // define this as a task
async fn async_driver(back_buffer: FrameBufferRef, static_driver: DisplayRef, signal: SignalRef) {
    loop {
        if !signal.signaled() { // wait for a signal
            todo!("Use `signal` to wait async")
        }
        info!("Received signal to draw");
        {
            let fb = back_buffer.lock().await; // acquire the lock
            let fb = &*fb; // unpack the guard, the guard will only drop at the end of the scope

            let drawable_area = fb.size();

            todo!("draw async the contents of framebuffer");

        } // drop mutex guard

        todo!("Reset the signal, to prevent an infinite loop");

        info!("Drawn");
        yield_now().await; // yield here, so we are certain other tasks can make progress
    }
}
Solution if !signal.signaled() {
signal.wait().await;Solution: draw async the contents of the framebuffer
{
    let fb = back_buffer.lock().await; // acquire lock
    let fb = &*fb; // unpack the guard, the guard will only drop at the end of the scope

    let drawable_area = fb.size();
    // draw to screen
    unwrap!(
        static_driver
            .set_pixels_buffered(
                0,
                0,
                drawable_area.width as u16 - 1,
                drawable_area.height as u16 - 1,
                fb.as_ref().iter().map(|&c| RawU16::from(c).into_inner()),
            )
            .await
    );
} // drop mutex guard
Solution: reset signal
signal.reset();Defining the draw task
The draw task is responsible for drawing to the framebuffer and handling the animation logic.
#[embassy_executor::task] // SEE LATER
async fn draw_task(back_buffer: FrameBufferRef, led: AnyPin, signal: SignalRef) {
    // Load the raw image
    let image_raw: ImageRawLE<Rgb565> = ImageRaw::new(include_bytes!("../assets/ferris.raw"), 86);
    // As we cannot pass generics down to the tasks, we must create the Output
    // here from an `AnyPin`.
    // `AnyPin` is a dynamic representation of a pin. It still provides the methods
    // available on the original pin, but without the need for the generics.
    let mut led = Output::new(led, Level::Low, OutputDrive::Standard);

    let interval = Duration::from_millis(500);
    let mut image = Image::new(&image_raw, Point::new(0, 0));
    let mut x = 0;
    loop {
        led.set_high(); // use the led to indicate what portion is busy where
        info!("Hello world");
        let image = Image::new(&image_raw, Point::new(x, 0));
        {
            let mut fb = back_buffer.lock().await;
            let fb = &mut *fb; // unpack guard

            // replace the todo's with each 1 line of code
            todo!("Fill the buffer with a background");
            todo!("Draw the image");

            todo!("signal to driver that draw has been called");
        } // Guard is dropped here

        x += 10;
        x %= 80;

        led.set_low();
        yield_now().await; // yield so other tasks can make progress

        embassy_time::Timer::after(interval).await; // wait before continuing
    }
}
Solution
let image = Image::new(&image_raw, Point::new(x, 0));
{
    let mut fb = back_buffer.lock().await;
    let fb = &mut *fb; // unpack guard

    unwrap!(fb.fill_solid(&fb.bounding_box(), Rgb565::BLACK));
    unwrap!(image.draw(fb));

    signal.signal(()); // signal to driver that draw has been called
} // Guard is dropped here
Executing the tasks
Now we have the tasks and all resources prepared, it is time to put them together.
Add the following code at the end of main.
Here we use the spawner that we get as an argument in the main task (you might need to rename _spawner to spawner for the following code to work).
unwrap!(spawner.spawn(async_driver(fb_ref, static_driver, signal_ref)));
unwrap!(spawner.spawn(draw_task(fb_ref, led.into(), signal_ref)));
And let us try and execute the code:
$ cargo run
If you would have gone previously with the unsafe mem::transmute route for the framebuffer, the above code will not work.
This is due to main ending before the other tasks terminate, the reference to the framebuffer has gone out of scope and has been dropped.
The tasks still having a reference to this framebuffer have now a dangling pointer.
To resolve this issue, you would need to extend the duration of main until the end of the program.
The easiest way to do this, is taking one of the tasks, and calling it as a normal async function at the end of main.
// ERROR: main should live forever, so putting everything on another task invalidates
// assumptions about the static lifetimes!
// unwrap!(spawner.spawn(draw_task(fb_ref, led.into(), signal_ref)));
draw_task(fb_ref, led.into(), signal_ref).await; // NEW
Also, do not forget to remove the #[embassy_executor::task] attribute from draw_task.
Otherwise, the above code will refuse to compile.
6. Reading four buttons
Used imports in this chapter
use defmt::{info, unwrap};
use embassy_executor::Spawner;
use embassy_futures::select::select4;
use embassy_futures::yield_now;
use embassy_nrf::gpio::{AnyPin, Input, Pull};
use embassy_nrf::peripherals::SPI3;
use embassy_nrf::{
    bind_interrupts,
    gpio::{Level, Output, OutputDrive},
    peripherals, spim,
};
use embassy_sync::signal::Signal;
use embassy_sync::{blocking_mutex::raw::NoopRawMutex, mutex::Mutex};
use embedded_graphics::pixelcolor::raw::RawU16;
use embedded_graphics::{
    image::{Image, ImageRaw, ImageRawLE},
    pixelcolor::Rgb565,
    prelude::*,
};
use static_cell::StaticCell;
use {defmt_rtt as _, panic_probe as _};
Phew, that were a few tough chapters. Luckily this chapter is easier. In this chapter we will read out the four buttons available on the development kit in an async fashion.
Acquiring the resources and starting the task
On the development kit, there are four buttons connected to pins P0.11, P0.12, P0.24, and P0.25.
The first two buttons are however also bound to two other pins, but the only difference here is that the logic is inverted.
Add the following code before starting the draw_task async function.
In the following steps, we will define the input_handler.
unwrap!(spawner.spawn(input_handler((
    p.P0_11.into(), // btn 1
    p.P0_12.into(), // btn 2
    p.P0_24.into(), // btn 3
    p.P0_25.into(), // btn 4
))));
The input handler task
This task will be responsible for listening to the input events generated by the buttons. For now, we will be content with logging the current state to our computer.
Configure the pins as Inputs with their Pull::Up mode.
If a pin is in Pull::Up mode, a high read signifies that the button is not pressed and a low read signifies that it is pressed.
Add the following code to the project and fill in the todo!s:
#[embassy_executor::task]
async fn input_handler(btns: (AnyPin, AnyPin, AnyPin, AnyPin)) {
    let mut btn1 = todo!();
    let mut btn2 = todo!();
    let mut btn3 = todo!();
    let mut btn4 = todo!();

    loop {
        // wait for any of the following 4 futures to complete
        // and use this as the result of the select4. This also
        // cancels the other 3 futures, but in our case this does not
        // matter.
        // Beware: Not all futures can be canceled -> read the docs
        select4(
            btn1.wait_for_any_edge(), // fires for either a rising, or falling edge
            btn2.wait_for_any_edge(),
            btn3.wait_for_any_edge(),
            btn4.wait_for_any_edge(),
        )
        .await; // wait for next button change

        info!( // fill in so we see a correct result
            "Detected input change 1: {}, 2: {}, 3: {}, 4: {}",
            todo!(),
            todo!(),
            todo!(),
            todo!()
        );
    }
}
Solution: AnyPin initialization
let mut btn1 = Input::new(btns.0, Pull::Up);
let mut btn2 = Input::new(btns.1, Pull::Up);
let mut btn3 = Input::new(btns.2, Pull::Up);
let mut btn4 = Input::new(btns.3, Pull::Up);
Solution: Reading out the button state
// log current state
info!(
    "Detected input change 1: {}, 2: {}, 3: {}, 4: {}",
    btn1.is_low(),
    btn2.is_low(),
    btn3.is_low(),
    btn4.is_low()
);
That's all for this chapter! Now flash the resulting code to your development kit and observe how the button events get triggered and logged. Do you observe something unusual? Do you always see all events? What about input delay? This is something we will fix in the next chapter.
7. Multiple priorities
Used imports in this chapter
use cortex_m_rt::entry;
use defmt::{info, unwrap};
use embassy_executor::{Executor, InterruptExecutor, Spawner};
use embassy_futures::select::select4;
use embassy_futures::yield_now;
use embassy_nrf::gpio::{AnyPin, Input, Pull};
use embassy_nrf::interrupt;
use embassy_nrf::interrupt::{InterruptExt, Priority};
use embassy_nrf::peripherals::SPI3;
use embassy_nrf::{
    bind_interrupts,
    gpio::{Level, Output, OutputDrive},
    peripherals, spim,
};
use embassy_sync::signal::Signal;
use embassy_sync::{blocking_mutex::raw::NoopRawMutex, mutex::Mutex};
use embedded_graphics::pixelcolor::raw::RawU16;
use embedded_graphics::{
    image::{Image, ImageRaw, ImageRawLE},
    pixelcolor::Rgb565,
    prelude::*,
};
use static_cell::StaticCell;
use {defmt_rtt as _, panic_probe as _};
The reason why the buttons did not always feel that snappy is because the input logic needs to share time with the other tasks. As such, it needs to wait its turn before being able to actually do some work. This is however not always desired, as some tasks need a higher priority than other tasks. In our case we should put the input handler task on a higher priority.
The way this is done in Embassy is by using a different executor (in our case based on interrupts) configured with this higher priority.
To do this, the first thing we should do is start managing the executors ourselves and get rid of the #[embassy_executor::main] attribute on main.
As we are still on an embedded system, we still need to make sure that our device knows where to start.
We will do this by adding a #[entry] attribute macro in its place.
This macro is defined by the cortex_m_rt crate and is also used by the #[embassy_executor::main] macro.
With this in mind, we will need to perform the following steps:
- Change the signature of
mainfromasync fn main(spawner: Spawner)tofn main() -> ! - Statically define the executors: one interrupt based (HIGH), one thread based (LOW)
- Define an interrupt handler to be used by Embassy to wake up the interrupt based executor needed for the higher priority
- Initialize the high priority executor and spawn the input handling task
- Initialize the low priority executor and spawn a task that will initiate the screen driver (needs async) and then spawn the driver task and main drawing task.
Using multiple cores.
Some embedded processors come with multiple physical cores.
One way to use those, is by instantiating multiple executors that are launched each on one core.
An example on how to do this with for example the rp2040 chip (Raspberry Pico) can be found at https://github.com/embassy-rs/embassy/blob/main/examples/rp/src/bin/multicore.rs.
Changing the signature of main
Change the signature of main:
// OLD
// #[embassy_executor::main]
// async fn main(spawner: Spawner) { }
// NEW
#[entry]
fn main() -> ! { }
Define an interrupt handler and configure the interrupt executor
First, we define the interrupt executor:
// Above main
static EXECUTOR_HIGH: InterruptExecutor = InterruptExecutor::new();
We follow this by adding the interrupt handler that will wake the executor.
/// Add interrupt, so the executor can wake from sleep
/// Forgetting to add this, results in no progress
#[interrupt]
unsafe fn SWI0_EGU0() {
    EXECUTOR_HIGH.on_interrupt();
}
Then in main right after setting up spi, res and rs, set the priority of the interrupt and attach it to the executor.
Next replace the todo! by spawning the input_handler task.
// set priority (in main)
info!("Starting high priority executor");
interrupt::SWI0_EGU0.set_priority(Priority::P6);
let high_spawner = EXECUTOR_HIGH.start(interrupt::SWI0_EGU0);
todo!("Use high_spawner to spawn `input_handler`");
Solution
#[entry]
fn main() -> ! {
    let p = embassy_nrf::init(Default::default());
    let led = p.P0_13;

    let mut config = spim::Config::default();
    config.frequency = spim::Frequency::M32;
    let spi = Spim::new_txonly(p.SPI3, Irqs, p.P0_04, p.P0_28, config);
    let res = Output::new(p.P0_29.into(), Level::Low, OutputDrive::Standard);
    let rs =  Output::new(p.P0_30.into(), Level::Low, OutputDrive::Standard);

    // Initialize the display here, such that we have less types
    // to write when starting our tasks.
    let mut display = st7735_lcd_async::ST7735::new(spi, rs, res, true, false);
    static DISPLAY_DRIVER: StaticCell<DisplayType> = StaticCell::new();
    let static_driver = DISPLAY_DRIVER.init(display);

    // set priority
    info!("Starting high priority executor");
    interrupt::SWI0_EGU0.set_priority(Priority::P6);
    let high_spawner = EXECUTOR_HIGH.start(interrupt::SWI0_EGU0);
    unwrap!(high_spawner.spawn(input_handler((
        // set buttons to be high priority
        p.P0_11.into(),
        p.P0_12.into(),
        p.P0_24.into(),
        p.P0_25.into(),
    ))));

    // Next part comes here ...
}
Define and initialize the low priority thread executor
First, we define, immediately after our previous executor, our thread executor.
static EXECUTOR_LOW: StaticCell<Executor> = StaticCell::new();Now add the following code,
under where we configured our previous executor.
Then move everything left in the original main to where it is indicated with the todo!, except for the construction of the display.
As moving peripherals over an async boundary can be tedious, we will instantiate the display driver before we start our low-priority executor.
The initialization however needs an async executor, so this will need to be passed down to the async part.
info!("Starting low priority executor");

// Initialize the display -> DO NOT MOVE
let mut config = spim::Config::default();
config.frequency = spim::Frequency::M32;
let spi = Spim::new_txonly(p.SPI3, Irqs, p.P0_04, p.P0_28, config);
let res = Output::new(p.P0_29, Level::Low, OutputDrive::Standard);
let rs = Output::new(p.P0_30, Level::Low, OutputDrive::Standard);

// Keep this part
let display = st7735_lcd_async::ST7735::new(spi, rs, res, true, false);
static DISPLAY_DRIVER: StaticCell<DisplayType> = StaticCell::new();
let static_driver: DisplayRef = DISPLAY_DRIVER.init(display);

// Everything after this point is now moved to the async main_task.
// This includes the actual startup code of the screen, but we keep
// the allocation here such that we have less typing to do.

let low_spawner = EXECUTOR_LOW.init(Executor::new()); // init executor
// Starts the executor
// NOTE: the run method never returns
low_spawner.run(move |spawner| {
    // We cannot yet run futures directly in this closure, so we should create
    // a new task whose sole purpose is to setup the peripherals and spawn the
    // other low priority tasks.
    #[embassy_executor::task]
    async fn main_task(spawner: Spawner, static_driver: DisplayRef, led: AnyPin) {
        todo!("Everything left in the original main should come here");
    }

    unwrap!(spawner.spawn(main_task(spawner, static_driver, led.into())));
});
// everything after here should be moved, or will never be executed
If you came this far, you should now have the same application as at the end of chapter 6, except the inputs should be much more responsive.
Try it out!
If not, here follows the entire code of main.rs up until now.
#![no_std]
#![no_main]

mod frame_buffer;
mod game;

use cortex_m_rt::entry;
use defmt::{info, unwrap};
use embassy_executor::{Executor, InterruptExecutor, Spawner};
use embassy_futures::select::select4;
use embassy_futures::yield_now;
use embassy_nrf::gpio::{AnyPin, Input, Pull};
use embassy_nrf::interrupt;
use embassy_nrf::interrupt::{InterruptExt, Priority};
use embassy_nrf::peripherals::SPI3;
use embassy_nrf::{
    bind_interrupts,
    gpio::{Level, Output, OutputDrive},
    peripherals, spim,
};
use embassy_sync::signal::Signal;
use embassy_sync::{blocking_mutex::raw::NoopRawMutex, mutex::Mutex};
use embedded_graphics::pixelcolor::raw::RawU16;
use embedded_graphics::{
    image::{Image, ImageRaw, ImageRawLE},
    pixelcolor::Rgb565,
    prelude::*,
};
use static_cell::StaticCell;

use embassy_101::framebuffer::FrameBuffer;
use {defmt_rtt as _, panic_probe as _};

bind_interrupts!(struct Irqs {
    SPIM3 => spim::InterruptHandler<peripherals::SPI3>;
});

static EXECUTOR_HIGH: InterruptExecutor = InterruptExecutor::new();
static EXECUTOR_LOW: StaticCell<Executor> = StaticCell::new();

/// Add interrupt, so the executor can wake from sleep
/// Forgetting to add this, results in no progress
#[interrupt]
unsafe fn SWI0_EGU0() {
    EXECUTOR_HIGH.on_interrupt();
}

pub type FrameBufferType = Mutex<NoopRawMutex, FrameBuffer>;
pub type FrameBufferRef = &'static FrameBufferType;
pub type SignalType = Signal<NoopRawMutex, ()>;
pub type SignalRef = &'static SignalType;
pub type DisplayType = st7735_lcd_async::ST7735<
    spim::Spim<'static, SPI3>,
    Output<'static, peripherals::P0_30>,
    Output<'static, peripherals::P0_29>,
>;
pub type DisplayRef = &'static mut DisplayType;

#[entry]
fn main() -> ! {
    let p = embassy_nrf::init(Default::default());
    let led = p.P0_13;

    let mut config = spim::Config::default();
    config.frequency = spim::Frequency::M32;
    let spi = spim::Spim::new_txonly(p.SPI3, Irqs, p.P0_04, p.P0_28, config);
    let res = Output::new(p.P0_29, Level::Low, OutputDrive::Standard);
    let rs = Output::new(p.P0_30, Level::Low, OutputDrive::Standard);

    let display = st7735_lcd_async::ST7735::new(spi, rs, res, true, false);
    static DISPLAY_DRIVER: StaticCell<DisplayType> = StaticCell::new();
    let static_driver: DisplayRef = DISPLAY_DRIVER.init(display);

    // set priority
    info!("Starting high priority executor");
    interrupt::SWI0_EGU0.set_priority(Priority::P6);
    let high_spawner = EXECUTOR_HIGH.start(interrupt::SWI0_EGU0);
    unwrap!(high_spawner.spawn(input_handler((
        // set buttons to be high priority
        p.P0_11.into(),
        p.P0_12.into(),
        p.P0_24.into(),
        p.P0_25.into(),
    ))));

    info!("Starting low priority executor");
    let low_spawner = EXECUTOR_LOW.init(Executor::new());
    low_spawner.run(move |spawner| {
        // we need an async context for the driver to start initializing -> add a main task
        #[embassy_executor::task]
        async fn main_task(spawner: Spawner, static_driver: DisplayRef, led: AnyPin) {
            info!("Starting main task");

            let mut delay = embassy_time::Delay;
            static_driver.init(&mut delay).await.unwrap();
            static_driver
                .set_orientation(&st7735_lcd_async::Orientation::Landscape)
                .await
                .unwrap();

            static BACK_BUFFER: StaticCell<FrameBufferType> = StaticCell::new();
            let fb_ref = BACK_BUFFER.init(Mutex::new(FrameBuffer::new()));

            static SIGNAL_REF: StaticCell<SignalType> = StaticCell::new();
            let signal_ref = SIGNAL_REF.init(Signal::new());

            unwrap!(spawner.spawn(async_driver(fb_ref, display, signal_ref)));
            unwrap!(spawner.spawn(draw_task(fb_ref, led, signal_ref)));
        }

        unwrap!(spawner.spawn(main_task(spawner, static_driver, led.into())));
    });
}

#[embassy_executor::task]
async fn input_handler(btns: (AnyPin, AnyPin, AnyPin, AnyPin)) {
    let mut btn1 = Input::new(btns.0, Pull::Up);
    let mut btn2 = Input::new(btns.1, Pull::Up);
    let mut btn3 = Input::new(btns.2, Pull::Up);
    let mut btn4 = Input::new(btns.3, Pull::Up);

    loop {
        select4(
            btn1.wait_for_any_edge(),
            btn2.wait_for_any_edge(),
            btn3.wait_for_any_edge(),
            btn4.wait_for_any_edge(),
        )
        .await;

        info!(
            "Detected input change 1: {}, 2: {}, 3: {}, 4: {}",
            btn1.is_low(),
            btn2.is_low(),
            btn3.is_low(),
            btn4.is_low()
        );
    }
}

#[embassy_executor::task]
async fn draw_task(back_buffer: FrameBufferRef, led: AnyPin, signal: SignalRef) {
    let image_raw: ImageRawLE<Rgb565> =
        ImageRaw::new(include_bytes!("../../assets/ferris.raw"), 86);
    let mut led = Output::new(led, Level::Low, OutputDrive::Standard);

    let interval = embassy_time::Duration::from_millis(500);
    let mut x = 0;
    loop {
        led.set_high();
        info!("Hello world");

        let image = Image::new(&image_raw, Point::new(x, 0));
        {
            let mut fb = back_buffer.lock().await;
            let fb = &mut *fb; // unpack guard
            unwrap!(fb.fill_solid(&fb.bounding_box(), Rgb565::BLACK));
            unwrap!(image.draw(fb));
            signal.signal(()); // signal to driver that draw has been called
        } // Guard is dropped here

        // update animation
        x += 10;
        x %= 80;

        yield_now().await;
        led.set_low();

        embassy_time::Timer::after(interval).await;
    }
}

#[embassy_executor::task]
async fn async_driver(back_buffer: FrameBufferRef, static_driver: DisplayRef, signal: SignalRef) {
    loop {
        if !signal.signaled() {
            signal.wait().await;
        }
        {
            let fb = back_buffer.lock().await;
            let fb = &*fb; // unpack the guard, the guard will only drop at the end of the scope

            let drawable_area = fb.size();
            unwrap!(
                static_driver
                    .set_pixels_buffered(
                        0,
                        0,
                        drawable_area.width as u16 - 1,
                        drawable_area.height as u16 - 1,
                        fb.as_ref().iter().map(|&c| RawU16::from(c).into_inner()),
                    )
                    .await
            );
        } // drop mutex guard
        signal.reset();
        yield_now().await;
    }
}
8. Let's play Pong
Used imports in this chapter
use cortex_m_rt::entry;
use defmt::{info, unwrap};
use embassy_101::game::{GameState, InputState};
use embassy_executor::{Executor, InterruptExecutor, Spawner};
use embassy_futures::select::select4;
use embassy_futures::yield_now;
use embassy_nrf::gpio::{AnyPin, Input, Pull};
use embassy_nrf::interrupt;
use embassy_nrf::interrupt::{InterruptExt, Priority};
use embassy_nrf::peripherals::SPI3;
use embassy_nrf::{
    bind_interrupts,
    gpio::{Level, Output, OutputDrive},
    peripherals, spim,
};
use embassy_sync::blocking_mutex::raw::CriticalSectionRawMutex;
use embassy_sync::signal::Signal;
use embassy_sync::{blocking_mutex::raw::NoopRawMutex, mutex::Mutex};
use embedded_graphics::draw_target::DrawTarget;
use embedded_graphics::geometry::{Dimensions, OriginDimensions};
use embedded_graphics::pixelcolor::raw::{RawData, RawU16};
use embedded_graphics::pixelcolor::Rgb565;
use embedded_graphics::prelude::*;
use embedded_graphics::primitives::Rectangle;
use embedded_graphics::Drawable;
use static_cell::StaticCell;
use {defmt_rtt as _, panic_probe as _};
Ok, we have already come a long way exploring many fundamental parts of the ecosystem. In this last chapter, we are going to build upon the foundations we built over the course of the last chapters and build a little game called Pong.
We rely on embedded_graphics for their abstractions to build more complex shapes.
Additionally, we will use Embassy to asynchronously process the input events.
Getting access in the draw_task to the input state
To share the input state, we need a way to store the information coming from the input_handler.
Look into the src/game.rs file, where there is already an InputState struct defined.
Some traits already have been derived, such that we can more easily share the input state.
#[derive(Default, Clone, Copy, PartialEq, Eq)]
pub struct InputState {
    pub btn1: bool,
    pub btn2: bool,
    pub btn3: bool,
    pub btn4: bool,
}
Just as before, let's add some helper type aliases.
// a shorthand, to not have to type this out every time we need it
pub type InputStateType = Mutex<CriticalSectionRawMutex, InputState>;
pub type InputStateRef = &'static InputStateType;
Then in our main function right before we spawn our input_handler, we initialize our struct, and retrieve a static reference to it:
// init input state, so we know that from now on input state will always be valid
static INPUT_STATE: StaticCell<InputStateType> = StaticCell::new();
let input_static_ref: InputStateRef = INPUT_STATE.init(Mutex::new(InputState::default()));
Something peculiar to the previous snippet is the use of CriticalSectionRawMutex instead of the usual NoopRawMutex.
This is because we are sharing across 2 different executors, where one of them is an interrupt based executor.
The CriticalSectionRawMutex ensures that no interrupts will be fired while it is locked, thereby sufficiently protecting our state.
The next step will now be to pass this freshly created reference to the corresponding tasks.
This includes sharing the reference and populating it with correct data in input_handler, and reading the state in draw_task.
At the end, you should have something like the following in draw_task:
// Later we will initialize the game state here
loop {
    // make sure that the mutex guard for input state is dropped
    // as soon as possible after we have copied the state.
    let input_state = { *input_state.lock().await };
    // Update here the game
    {
        let mut fb = back_buffer.lock().await;
        let fb = &mut *fb; // unpack guard

        // start drawing calls
        unwrap!(fb.fill_solid(&fb.bounding_box(), Rgb565::BLACK));
        // Draw here the game

        signal.signal(()); // signal to driver that draw has been called
    } // Guard is dropped here
    led.set_low();
    yield_now().await;
}
And the following input_handler:
#[embassy_executor::task]
async fn input_handler(
    btns: (AnyPin, AnyPin, AnyPin, AnyPin),
    input_state: InputStateRef,
    led: AnyPin, // We optionally add here a pin, such that we can more easily debug things
) {
    // Initialize all the buttons
    let mut btn1 = Input::new(btns.0, Pull::Up);
    let mut btn2 = Input::new(btns.1, Pull::Up);
    let mut btn3 = Input::new(btns.2, Pull::Up);
    let mut btn4 = Input::new(btns.3, Pull::Up);

    let mut led = Output::new(led, Level::Low, OutputDrive::Standard);

    loop {
        // Wait until we see a button change
        select4(
            btn1.wait_for_any_edge(),
            btn2.wait_for_any_edge(),
            btn3.wait_for_any_edge(),
            btn4.wait_for_any_edge(),
        )
        .await;

        // Create an updated state
        led.set_high();
        let state = InputState {
            btn1: btn1.is_low(),
            btn2: btn2.is_low(),
            btn3: btn3.is_low(),
            btn4: btn4.is_low(),
        };
        {
            // Send the update to the other tasks
            *input_state.lock().await = state; // keep lock as small as possible
        } // drop immediatly

        // Log something, such that we know what is happening
        info!(
            "Detected input change 1: {}, 2: {}, 3: {}, 4: {}",
            state.btn1, state.btn2, state.btn3, state.btn4,
        );
        led.set_low();
    }
}
Implementing the game logic
Next is actually implementing the game of Pong. We will start by creating a struct for the players:
pub struct Player {
    position: Point, // the current position of the player
}

impl Player {
    /// p is the initial point to spawn the player on
    pub fn new(p: Point) -> Self {
        Self { position: p }
    }

    // make sure that the player can only move on the screen
    // the max height is 128 pixels
    pub fn move_up(&mut self) {
        todo!()
    }

    // make sure that the player can only move on the screen
    // the min height is 0 pixels
    pub fn move_down(&mut self) {
        todo!()
    }
}
Solution: move_up
pub fn move_up(&mut self) {
    self.position.y -= 10;
    self.position.y = self.position.y.clamp(0, 128);
}
Solution: move_down
pub fn move_down(&mut self) {
    self.position.y += 10;
    self.position.y = self.position.y.clamp(0, 128);
}
To make it easier for us to later do the collision detection, while leveraging embedded_graphics, we will implement some interesting traits that keep track off how big the player is (already provided), and how to draw the player on screen (target):
// Drawable is something that can be drawn onto the screen
impl Drawable for Player {
    type Color = Rgb565; // needed to be compatible with our screen

    type Output = (); // we will not need to return anything after drawing

    fn draw<D>(&self, target: &mut D) -> Result<Self::Output, D::Error>
    where
        D: DrawTarget<Color = Self::Color>,
    {
        // Make sure you use the same values as used in the Dimensions
        // trait implementation. Otherwise the collision detection will
        // be harder to correctly implement
        todo!("Look at how we have drawn a rectangle in the past")
    }
}

// Have a way to know what the bounding box of the player is
impl Dimensions for Player {
    fn bounding_box(&self) -> Rectangle {
        Rectangle {
            top_left: self.position,
            size: Size {
                width: 5, // these seem good values
                height: 30,
            },
        }
    }
}
Solution: Draw
/// Draw a player as a rectangle and use the values from Dimensions-trait.
/// This makes it easier in the GameState to do the collision detection calculations
fn draw<D>(&self, target: &mut D) -> Result<Self::Output, D::Error>
where
    D: DrawTarget<Color = Self::Color>,
{
    let rectangle = self.bounding_box();
    let style = PrimitiveStyle::with_fill(Rgb565::WHITE);
    rectangle.draw_styled(&style, target)
}
Similarly for the ball, we are going to need to implement a few methods on the Pong struct.
pub struct Pong {
    pub position: Point, // current position
    pub velocity: Point, // to where we will update the position
}

impl Pong {
    pub fn new(p: Point) -> Self {
        Self {
            position: p,
            velocity: Point::new(3, 3),
        }
    }

    pub async fn update(&mut self) {
        todo!()
    }

    pub fn flip_horizontal(&mut self) {
        todo!()
    }

    pub fn flip_vertical(&mut self) {
        todo!()
    }
}

impl Drawable for Pong {
    type Color = Rgb565;

    type Output = ();

    fn draw<D>(&self, target: &mut D) -> Result<Self::Output, D::Error>
    where
        D: DrawTarget<Color = Self::Color>,
    {
        todo!("This time draw me as a circle -> take a look at the primitives section in the embedded_graphics documentation")
    }
}

impl Dimensions for Pong {
    fn bounding_box(&self) -> Rectangle {
        Rectangle {
            top_left: self.position,
            size: Size {
                width: 10, // seem good values
                height: 10,
            },
        }
    }
}
Solution: Update
pub async fn update(&mut self) {
    self.position += self.velocity;
}
Solution: Flip horizontal/vertical
pub fn flip_horizontal(&mut self) {
    self.velocity.y = -self.velocity.y;
}

pub fn flip_vertical(&mut self) {
    self.velocity.x = -self.velocity.x;
}
Solution: Draw
fn draw<D>(&self, target: &mut D) -> Result<Self::Output, D::Error>
where
    D: DrawTarget<Color = Self::Color>,
{
    let circle = Circle::new(self.position, 10);
    let style = PrimitiveStyle::with_fill(Rgb565::WHITE);
    circle.draw_styled(&style, target)
}
And now the game state itself.
We will need a struct which can store both players, their scores and the ball.
There is already a GameState defined in src/game.rs, but it needs some extra code to be completely functional.
The definition of the GameState is:
pub struct GameState {
    score1: u32, // The score of player 1
    player1: Player, // Player 1
    score2: u32, // The score of player 2
    player2: Player, // Player 2
    pong: Pong, // The ball
    screen_box: Rectangle, // The bounds of the current screen
}
We have already defined the following methods:
new: The constructorupdate: Updates the game state and does the collision detectiondraw: Draws a line in the middle, draws the scores, the 2 players and the ball
Now, you should complete the draw method as it does not yet draw the players and the ball as it should.
impl Drawable for GameState {
    type Color = Rgb565;

    type Output = ();

    fn draw<D>(&self, target: &mut D) -> Result<Self::Output, D::Error>
    where
        D: DrawTarget<Color = Self::Color>,
    {
        // ... more drawing code here ...

        // power of the abstractions of embedded_graphics -> draw the players and ball
        todo!("Draw player1, player2 and pong"); // REPLACE THIS
    }
}
Solution
impl Drawable for GameState {
    type Color = Rgb565;

    type Output = ();

    fn draw<D>(&self, target: &mut D) -> Result<Self::Output, D::Error>
    where
        D: DrawTarget<Color = Self::Color>,
    {
        let background_style = PrimitiveStyle::with_fill(Rgb565::CSS_GRAY);
        let screen_box = target.bounding_box();
        let split_line = Rectangle::with_center(
            screen_box.center(),
            Size {
                width: 2,
                height: screen_box.size.height,
            },
        );

        split_line.draw_styled(&background_style, target)?;

        // use the font system of embedded_graphics
        let score_style = MonoTextStyle::new(&FONT_6X10, Rgb565::CSS_GRAY);

        // pprint score 1 with a stack allocated string
        let mut score1 = heapless::String::<4>::new();
        if { write!(score1, "{}", self.score1) }.is_err() {
            defmt::error!("Error while formatting score 1");
        }
        Text::with_alignment(
            &score1,
            Point::new(3 * screen_box.size.width as i32 / 4, 10),
            score_style,
            Alignment::Center,
        )
        .draw(target)?;

        // pprint score 2
        let mut score2 = heapless::String::<4>::new();
        if { write!(score2, "{}", self.score2) }.is_err() {
            defmt::error!("Error while formatting score 2");
        }
        Text::with_alignment(
            &score2,
            Point::new(screen_box.size.width as i32 / 4, 10),
            score_style,
            Alignment::Center,
        )
        .draw(target)?;

        // power of the abstractions of embedded_graphics -> draw the players and ball
        self.player1.draw(target)?; // NEW
        self.player2.draw(target)?; // NEW
        self.pong.draw(target) // NEW
    }
}
Now all we still have to do is initialize our game state in the draw_task, update it every frame, and draw it to the framebuffer.
// draw_task
let mut game_state = todo!(); // NEW
loop {
    let input_state = { *input_state.lock().await };
    game_state.update(input_state).await; // NEW
    {
        let mut fb = back_buffer.lock().await;
        let fb = &mut *fb; // unpack guard

        // start drawing calls
        unwrap!(fb.fill_solid(&fb.bounding_box(), Rgb565::BLACK));
        unwrap!(game_state.draw(fb)); // NEW

    } // Guard is dropped here
    signal.signal(()); // signal to driver that draw has been called
    yield_now().await;
}
Solution
let mut game_state = GameState::new(Rectangle {
    top_left: Point::new(0, 0),
    size: Size::new(160, 128),
});
🎉 Congratulations 🎉
This is the end of this book. You should now have a working Pong game. Try to play a bit and enjoy your async Pong implementation.
If you got here, but did not have a finished game, try to make sure that you have spawned all the necessary tasks.
The tasks that need to be spawned:
input_handler: Spawned in the high priority executormain: Spawned as the first task in the low priority executordraw_task: Called at the end of mainasync_driver: Spawned at the end of main
If your input is not working as expected, make sure that:
- You update the
InputStateininput_handler - The input is correctly shared between the
input_handlerand thedraw_task - You drop the mutex guard quickly enough in the
draw_task
If the game is not updating, see if you maybe forgot to call .await on a future.
Futures in Rust do not call themselves, so if you forget to call .await, to progress will be made.
Ps. Is it getting a bit slow? Try to compile in release mode:
$ cargo run --release # and now wait until it compiles :p
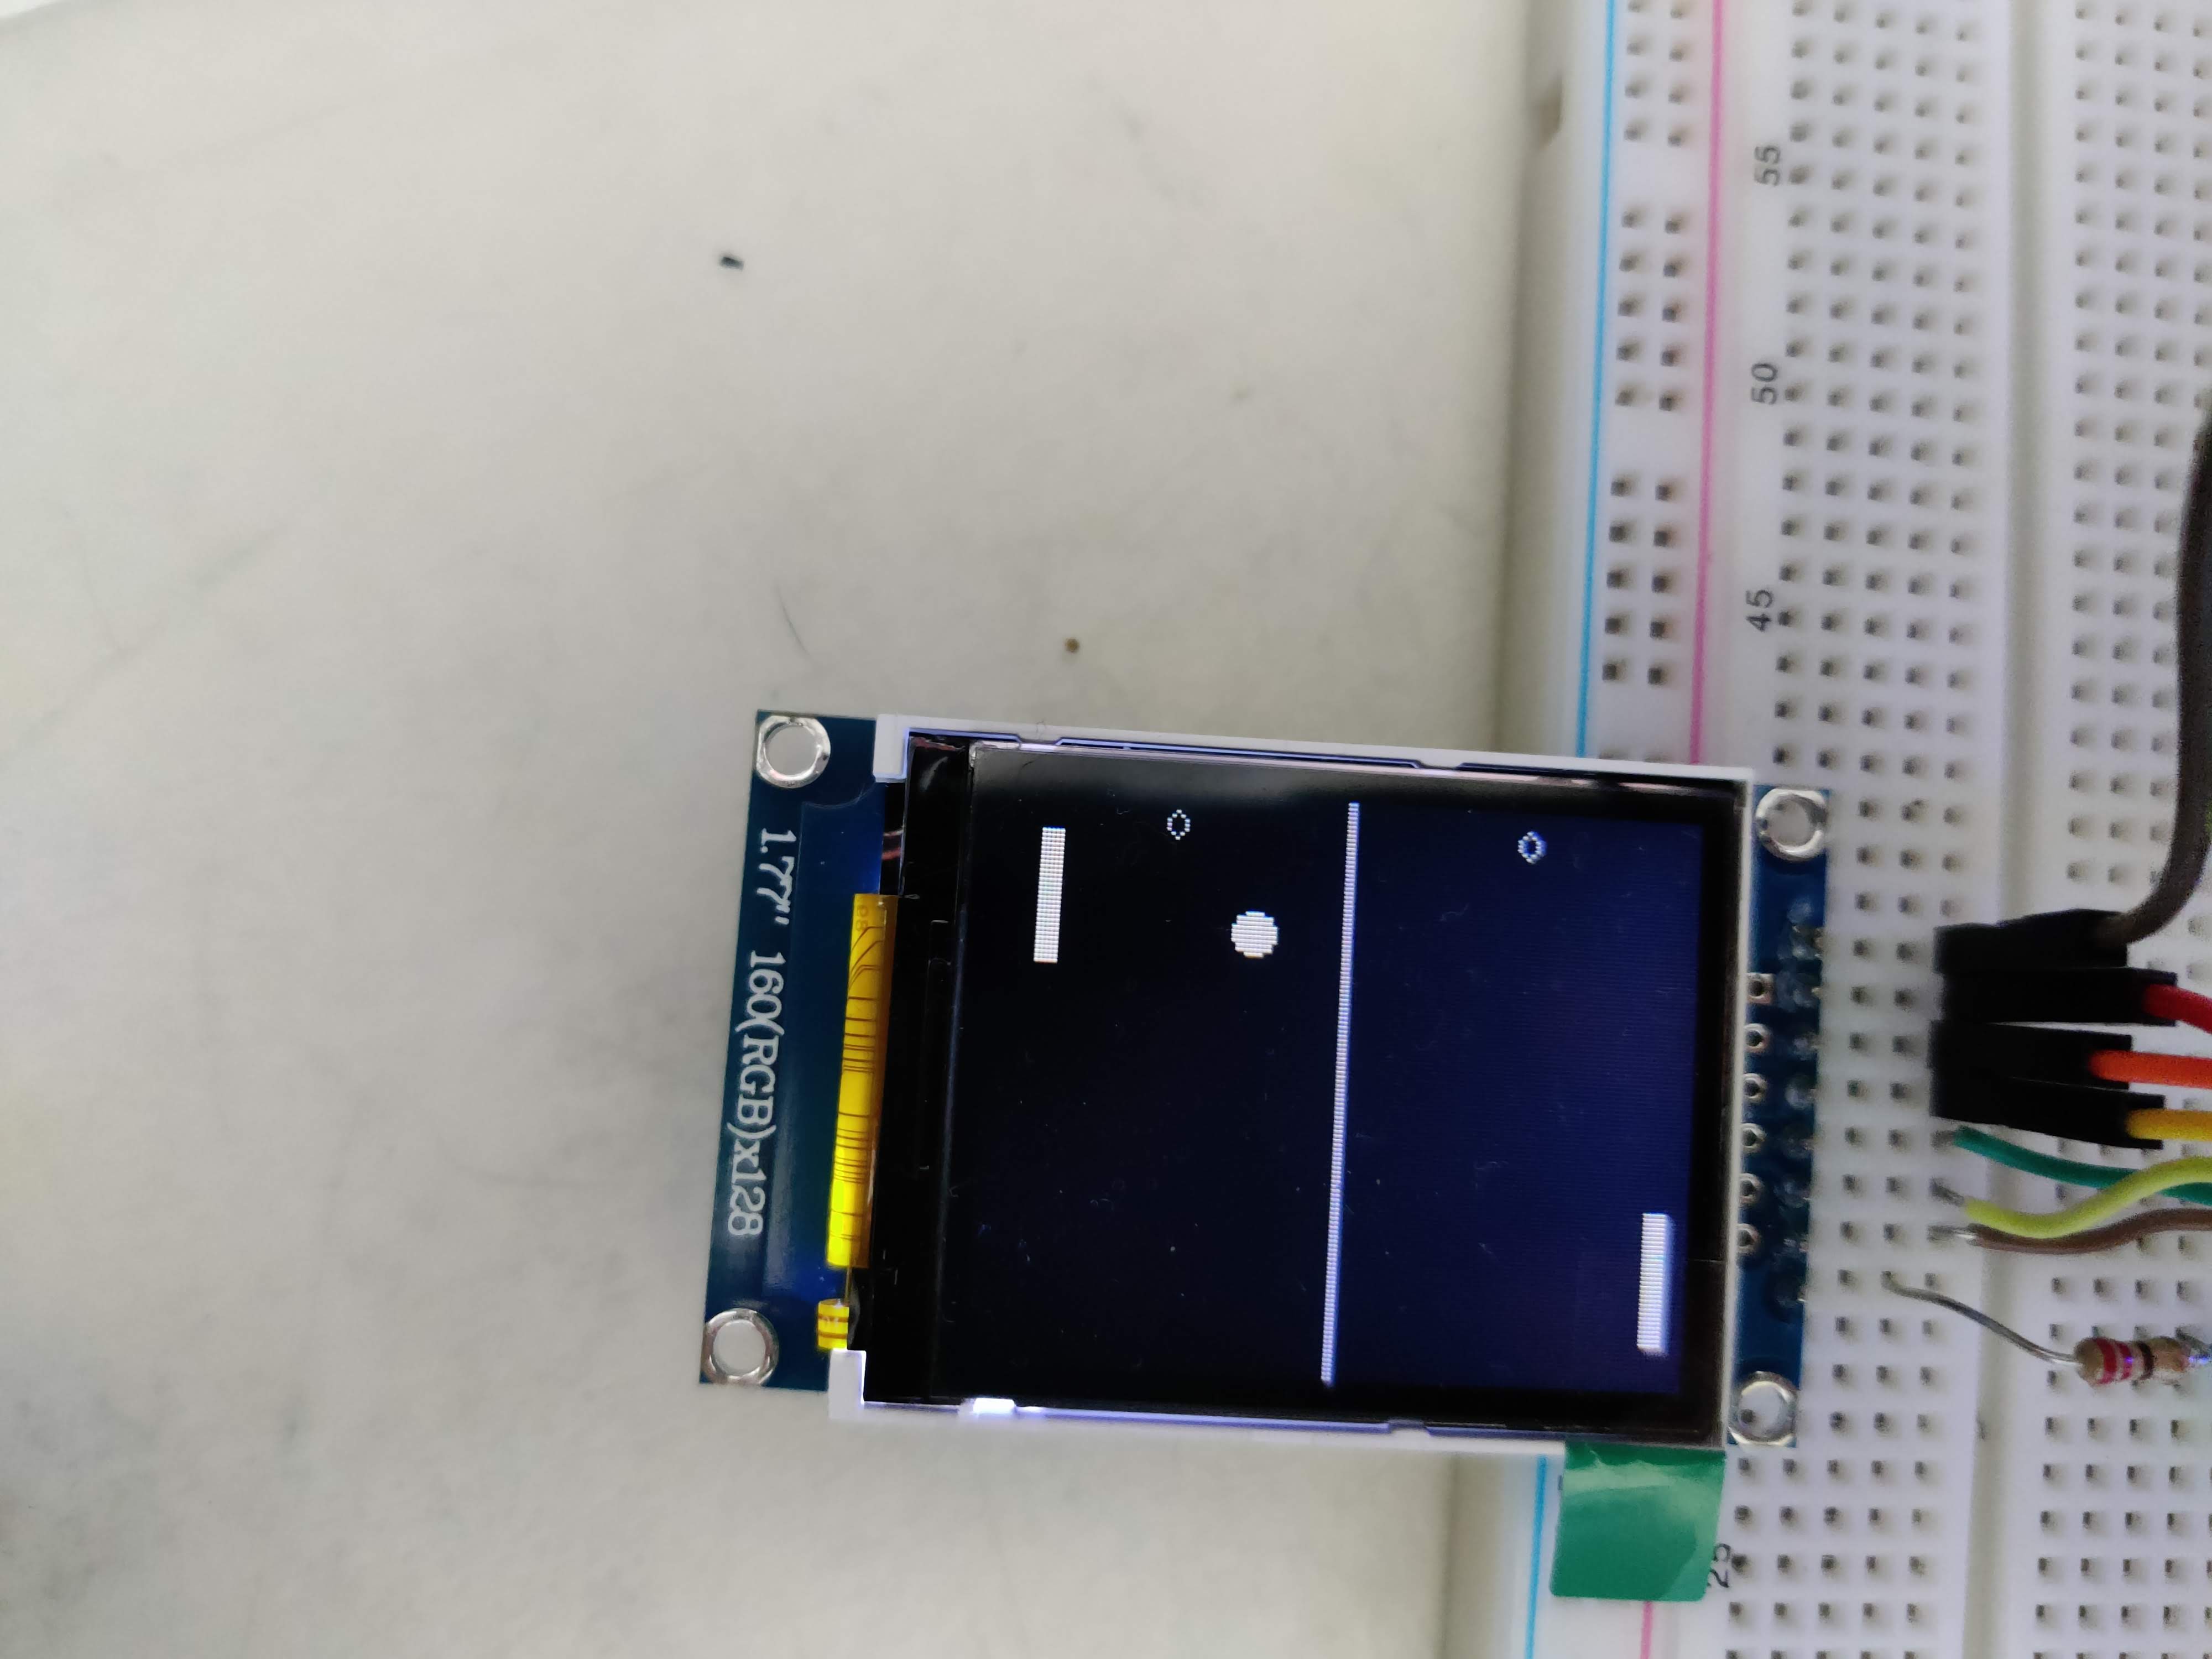
Appendix: Mutexes in Rust + Embassy
A mutex is a synchronization structure that allows sharing data across concurrency boundaries, while preventing race conditions. As mutexes are different in Rust compared to other languages like Java or C++, this appendix was added to help fill in the gaps and show some common pitfalls. This appendix will start from the very basics, so feel free to skip some parts if you already know these things.
Why and what is a mutex?
When you want to have concurrency in a program, you will come to a point where it becomes necessary to share some data. An example of such a situation could be:
use std::time::Duration;
use std::thread;

// Global shared memory
static mut COUNTER: u32 = 0;

pub fn main() {
    thread::scope(|s| {
        // We start a first thread
        s.spawn(|| unsafe {
            // We read, increment, write back the counter
            for _ in 0..100 {
                let mut count = COUNTER;
                count += 1;
                thread::sleep(Duration::from_millis(1));
                COUNTER = count;
            }
        });
        // We start another thread
        s.spawn(|| unsafe {
            // We read, increment, write back the counter
            for _ in 0..100 {
                let mut count = COUNTER;
                count += 1;
                thread::sleep(Duration::from_millis(1));
                COUNTER = count;
            }
        });
    }); // We join the two threads

    // And print the result which is most probably not equal to 200
    println!("Result of the count: {} == 200?", unsafe { COUNTER });
}
The above example has the issue that the resulting count is not always 200. Such a bug is called a race condition and stems from the issue that both write to, and read from the same variable concurrently without acknowledging each other. This is where mutexes come in, as they provide a way to ensure exclusive access to a piece of memory.
Mutexes in Rust
The Rust standard library provides a Mutex (https://doc.rust-lang.org/std/sync/struct.Mutex.html) type.
Traditionally, in languages like Java or C++, one would add an extra variable containing a mutex.
This mutex would then be used in conjunction with the piece of memory we want to protect.
Often, this can lead to error prone code, as it is not very difficult to not lock the mutex and just use the memory that should have been protected.
This is where Rust's borrow checker and Mutex come in.
Instead of having a second variable containing a mutex, the protected data is
stored inside the mutex, making the mutex a container type.
When you would want to use the protected data, the only way would be to lock the mutex and retrieve a guard.
This guard works like a smart pointer that releases the lock when dropped.
An example use of Rust's Mutex:
use std::sync::Mutex;
let counter = Mutex::new(0usize);
*counter.lock().unwrap() += 1;
As can be seen from the example, we first get a Result back when locking a mutex.
This is a safety feature from Rust, which denotes that another thread may have panic'ed while holding the lock.
This may result in unexpected behavior, as the data protected by the mutex may be in an inconsistent state.
Correctly handling this Result helps to detect and mitigate this.
A common pattern in concurrent Java code, is to repeatably lock a mutex. This is possible due to the reentrant nature of mutexes in Java. Mutexes in Rust are however not reentrant, so locking a mutex a second time, while the first one is still active, will block the current thread. This is independent on where you lock your mutex for the second time. The idea is here that you would lock a mutex, and keep the guard until you no longer need it.
Some possible unexpected behavior of mutex guards in Rust is how long they live.
A possible situation could be the following: there is a mutex guarding a Vec and you want to pop the last element after which you want to immediately release the lock.
One naive way to write this, would be:
let v = Mutex::new(vec![1, 2, 3]);
if let Some(element) = v.lock().unwrap().pop() {
    // Do something useful with `element`.
    // The lock is still active here due to the `if let`
} // <- the guard is dropped here
This is due to the fact that Rust captures all lifetimes in the if let.
This is normally to prevent some unsound behavior, but here it works against us.
To solve this, you need to release the lock before the if let.
let v = Mutex::new(vec![1, 2, 3]);
let option_element = v.lock().unwrap().pop();
// ^^^ the guard is dropped here
if let Some(element) = option_element {
    // Do something useful with `element`.
    // The lock is no longer active here
}
Mutexes in Embassy
Now that we have discussed mutexes in Rust, it is time to look at the mutexes in Embassy. The standard library is however not available in an embedded environment, so Embassy needs to provide its own mutexes. Embassy has defined its own set of mutexes in order to accommodate different needs and constraints in an embedded setting.
Embassy defines an async Mutex that instead of blocking, can be awaited.
This has the advantage that other tasks may make progress while we wait for the mutex to become available.
To make a mutex work, there needs to be some mechanism to communicate between different threads of execution.
These communication mechanisms are mostly internal to the implementation of a mutex, but Embassy provides a way to specify what guarantees need to be made.
Upon specifying the type of a mutex in Embassy, you need to select a RawMutex, that needs to be passed as a generic parameter.
Here follows a list of the most important RawMutexes:
NoopRawMutex: No special underlying synchronization. Most basic, but only valid when sharing data between tasks in the same executor, and there is only one core of the device you are programming.CriticalSectionMutex: Turns off certain processor features like interrupts while acquiring the lock. Useful when sharing data across different executors.ThreadModeMutex: Sharing singleton values between tasks on the same executor.
Further reading
- Mutexes in Embassy: https://docs.embassy.dev/embassy-sync/git/default/mutex/struct.Mutex.html
- Mutexis in std: https://doc.rust-lang.org/std/sync/struct.Mutex.html
Atomics and locksbook from Mara Bos (not sponsored): https://marabos.nl/atomics/SendandSync, the basis of all Rust's concurrency: https://doc.rust-lang.org/nomicon/send-and-sync.html
A2: Poll and advanced async
In this appendix we are going over the more advanced parts of async/await in Rust. For the most part, as a consumer of async/await, you normally do not have to deal with this. However, in an embedded context, it may become necessary to interact with polling interfaces which do not have any knowledge of the async/await features in Rust. This appendix will present a short introduction to the topic such that you can work with it if needed.
Futures in Rust
Async/await in Rust is syntactic sugar over the Future-trait.
Futures provide a polling mechanism to allow them to make progress.
Futures on their own, do not actually run.
They need an executor to poll them iteratively.
A very simplified mental version of such an executor could be:
pub struct Executor {
    futures: Vec<Box<dyn Future>>,
}

impl Executor {
    pub fn run(&mut self) {
        for future in self.futures.iter_mut() {
            future.poll();
        }
    }
}
The previous code sample already shows some interesting bits about async/await in Rust. First and foremost, they are not threads. Some executors like the one implemented in tokio-rs allow for futures to be scheduled on multiple threads, but you do not get out-of-the-box actual multi-threading. As an example of this, the executor we used in this course, only uses 1 core. Where futures shine the most, is in applications where you need to wait a lot on external events like reading data from disk, making a network request or waiting for a button to be pressed.
However, the above example has a big issue: futures might need to have references to itself.
This is not easy in Rust, as moving values in Rust is an operation that is often done.
When compiling a Rust program (without optimizations) these moves often get translated into a memcpy.
If you have references to yourself, and you move this memory, the references will still reference the old memory location.
This would result in immediate undefined behavior which is not something you would want in a Rust program.
Normally, Rust does not allow direct self-references, due to the exact issue described above.
To still allow futures to make self-references, the Pin type can be used.
The Pin type takes a mutable pointer to a memory location and ensures that the memory behind it does not get moved.
To ensure that futures never get moved while they are executing, the polling method requires that the future is pinned.
However, pinning every future significantly increases the complexity of calling futures, even in scenarios where there are no self-references.
To combat this, Rust defines the UnPin trait.
If a struct implements the UnPin trait, pinnig will become a NOP.
Like Send and Sync, UnPin is a so-called auto-trait and is automatically implemented on all your types if all its fields are also UnPin.
At this point, we have an executor that allows its futures to have self-references, but constantly polling might be a waste of resources.
An example of this would be an embedded device with limited computing/memory/energy resources that needs to wait on a timer to go off, and keeps constantly polling for updates.
This is why Rust's Future::poll needs a context as its argument.
This context allows to get access to a Waker.
This Waker can then be used to signal to the executor that it is ready to make progress.
This mechanism then allows the executor to prioritize futures that actually can make progress while allowing it to go into a sleep mode if no future can make progress.
Interacting with polling interfaces
When writing async code with the async/await keywords, you might come in the situation where you need to interact with a polling interface.
Some of these polling interfaces, require a context which is normally not available when using the async keyword.
For this, Rust provides the core::future::poll_fn function.
As the argument, you can pass it a function that takes a context as its argument.
This allows you inside this function to access the current context and call the polling interface.
use std::future::Future;
use std::pin::pin;
use std::time::Duration;
use tokio::time::sleep;

async fn sleepy_polling_future() {
    sleep(Duration::from_millis(100)).await;
    println!("100 ms have elapsed");
}

#[tokio::main]
async fn main() {
    let mut future = pin!(sleepy_polling_future()); // first we pin
    std::future::poll_fn(|cx| future.as_mut().poll(cx)).await; // Then we execute
}
Further reading
Here are some interesting resources that may be off help when further studying the core concepts of advanced async Rust.
- General Tokio tutorial: https://tokio.rs/tokio/tutorial
- Part of previous, but one of the most interesting resources about async Rust: https://tokio.rs/tokio/tutorial/async
- Documentation of
Pin, the what, why and how: https://doc.rust-lang.org/std/pin/index.html - When writing a lot of unsafe code or your own async concurrency primitives,
miriis a tool that can help detect soundness issues: https://github.com/rust-lang/miri