1. Installation
To be able to participate in this workshop, you need to first install some tools.
This workshop is based on the nRF52840 DK board and a 1.77" SPI display based on the ST7735S chip.
Meaning of the colored boxes
Certain information in this workshop is highlighted with colored boxes. This is their meaning:
Action
An action you should perform.
Info
Some extra information which may be helpful.
Warning
Some information that you should read to prevent some errors.
Installing Rust
As this is a Rust workshop, you first need to install the needed Rust toolchain.
The easiest way is through installing rustup https://www.rust-lang.org/tools/install.
Make sure that you have at least a version of Rust higher than 1.75.
You can check your current version of Rust through: rustc -V.
If you do not have a recent enough version, please update with rustup update stable.
You may use your editor of choice, but we recommend VSCode https://code.visualstudio.com/.
Make sure that you also install the rust-analyzer-plugin for your editor.
In the case of VSCode this is https://marketplace.visualstudio.com/items?itemName=rust-lang.rust-analyzer
Installing tools for communicating with the nRF52840 DK
To be able to communicate with the nRF52840 DK, we need to configure our systems,
and potentially install a driver.
Linux
On Debian-based distributions:
$ sudo apt-get install libudev-dev libusb-1.0-0-dev pkg-config
$ cat /etc/udev/rules.d/50-oxidize-global.rules
# udev rules to allow access to USB devices as a non-root user

# nRF52840 Dongle in bootloader mode
ATTRS{idVendor}=="1915", ATTRS{idProduct}=="521f", TAG+="uaccess"

# nRF52840 Dongle applications
ATTRS{idVendor}=="2020", TAG+="uaccess"

# nRF52840 Development Kit
ATTRS{idVendor}=="1366", ENV{ID_MM_DEVICE_IGNORE}="1", TAG+="uaccess"
For Arch Linux
There is a package for the udev rules in the repos. To install it with paru: paru -S nrf-udev
Windows
For Windows, to be able to program the chip on the development kit,
you should associate the device with WinUSB.
This is because the tools needed to write to a device are based on libusb.
Therefore, a libusb compatible driver should be installed.
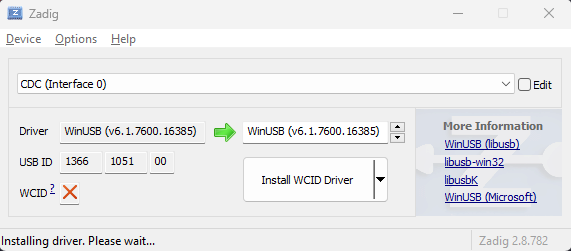
The easiest way to accomplish this is through a tool called Zadig (https://zadig.akeo.ie) which will do most of the heavy lifting.
Note that Zadig works on a per-device basis and may remove previously installed JLink drivers.
If you require the JLink drivers to persist on your computer, make sure that you only overwrite the drivers associated with your current development kit.
To install through winget:
$ winget install akeo.ie.Zadig
After installation, disconnect all USB devices from your computer and connect your development kit.
Open now Zadig and select your device.
The USB id should now be starting with 1366 1015.
If this is the case, click on Install WCID Driver/Replace driver.
If for some reason Zadig does not recognize you device, try to enable Options>List all devices.
When looking for the correct device, try to look for the ones that have as a driver something with JLink in their name.
Installing Rust embedded related tools
We are now going to install the required Rust tools to flash our programs to a real device.
Some tools in the following list are optional (annotated with optional), and may be handy if you later want to dig in deeper into embedded Rust.
$ cargo install probe-rs-tools --locked # easily flash and view logs
$ cargo install flip-link # help with stack protection, when overflowing
$ cargo install cargo-binutils # optional, tools for analyzing final binary
$ rustup +stable component add llvm-tools-preview # optional, tools for analyzing final binary
Clone the repository with the starters code
$ git clone https://gitlab.com/etrovub/smartnets/rustiec-embedded/embedded-101.git --recurse-submodules
$ cd embedded-101
Now proceed by trying to build the initial template. The first time you will run this command, will also install the last remaining tools.
$ cargo build
If you are curious about how the configuration works and how Rust knows how to install which toolchains, here is a list of the most important files and their current purpose.
.cargo/config.toml: Configureprobe-rsas a runner, so we can upload our binaries immediately to our device. It also sets the correct compilation target as the default target, and setsflip-linkas the used linker for better stack overflow protection.rust-toolchain.toml: Tell Rust which targets need to be present for a correct working project.memory.x: As we are working with an embedded target, we need to tell the linker how to place the different memory blocks in memory. Most of the work is already done by some of the crates we are using, but they still need some values specific for our device to be defined.build.rs: Putmemory.xin a known location for the linker to find it and adds extra linker arguments, so we can have debug output.Cargo.toml: Configures the dependencies of our project.